PHP 二维数组 按照 Value 中某 key 进行排序 获得另一个 key 的排序

<?php
$arr = [
    ['id'=>1,'main'=>222],
    ['id'=>2,'main'=>333],
    ['id'=>2,'main'=>444],
    ['id'=>1,'main'=>111],
    ['id'=>3,'main'=>122],
    ];
    
    $a = array_column($arr,'main');
    $b = array_column($arr,'id');
    
    echo "<pre>";
    var_dump($a,$b);
    var_dump(array_multisort($a,SORT_DESC,$b));
    var_dump($a,$b);
?>

array_multisort() 先把第一个数组按照键值的大小排序,然后其它数组都按照第一个数组的调整策略进行调整。

优化一下则为

<?php

$arr = [
    ['id'=>1,'main'=>222],
    ['id'=>2,'main'=>333],
    ['id'=>2,'main'=>444],
    ['id'=>1,'main'=>111],
    ['id'=>3,'main'=>122],
    ];
    
    echo "<pre>";
    array_multisort(array_column($arr,'main'),SORT_DESC,$arr);
    var_dump($arr);
?>

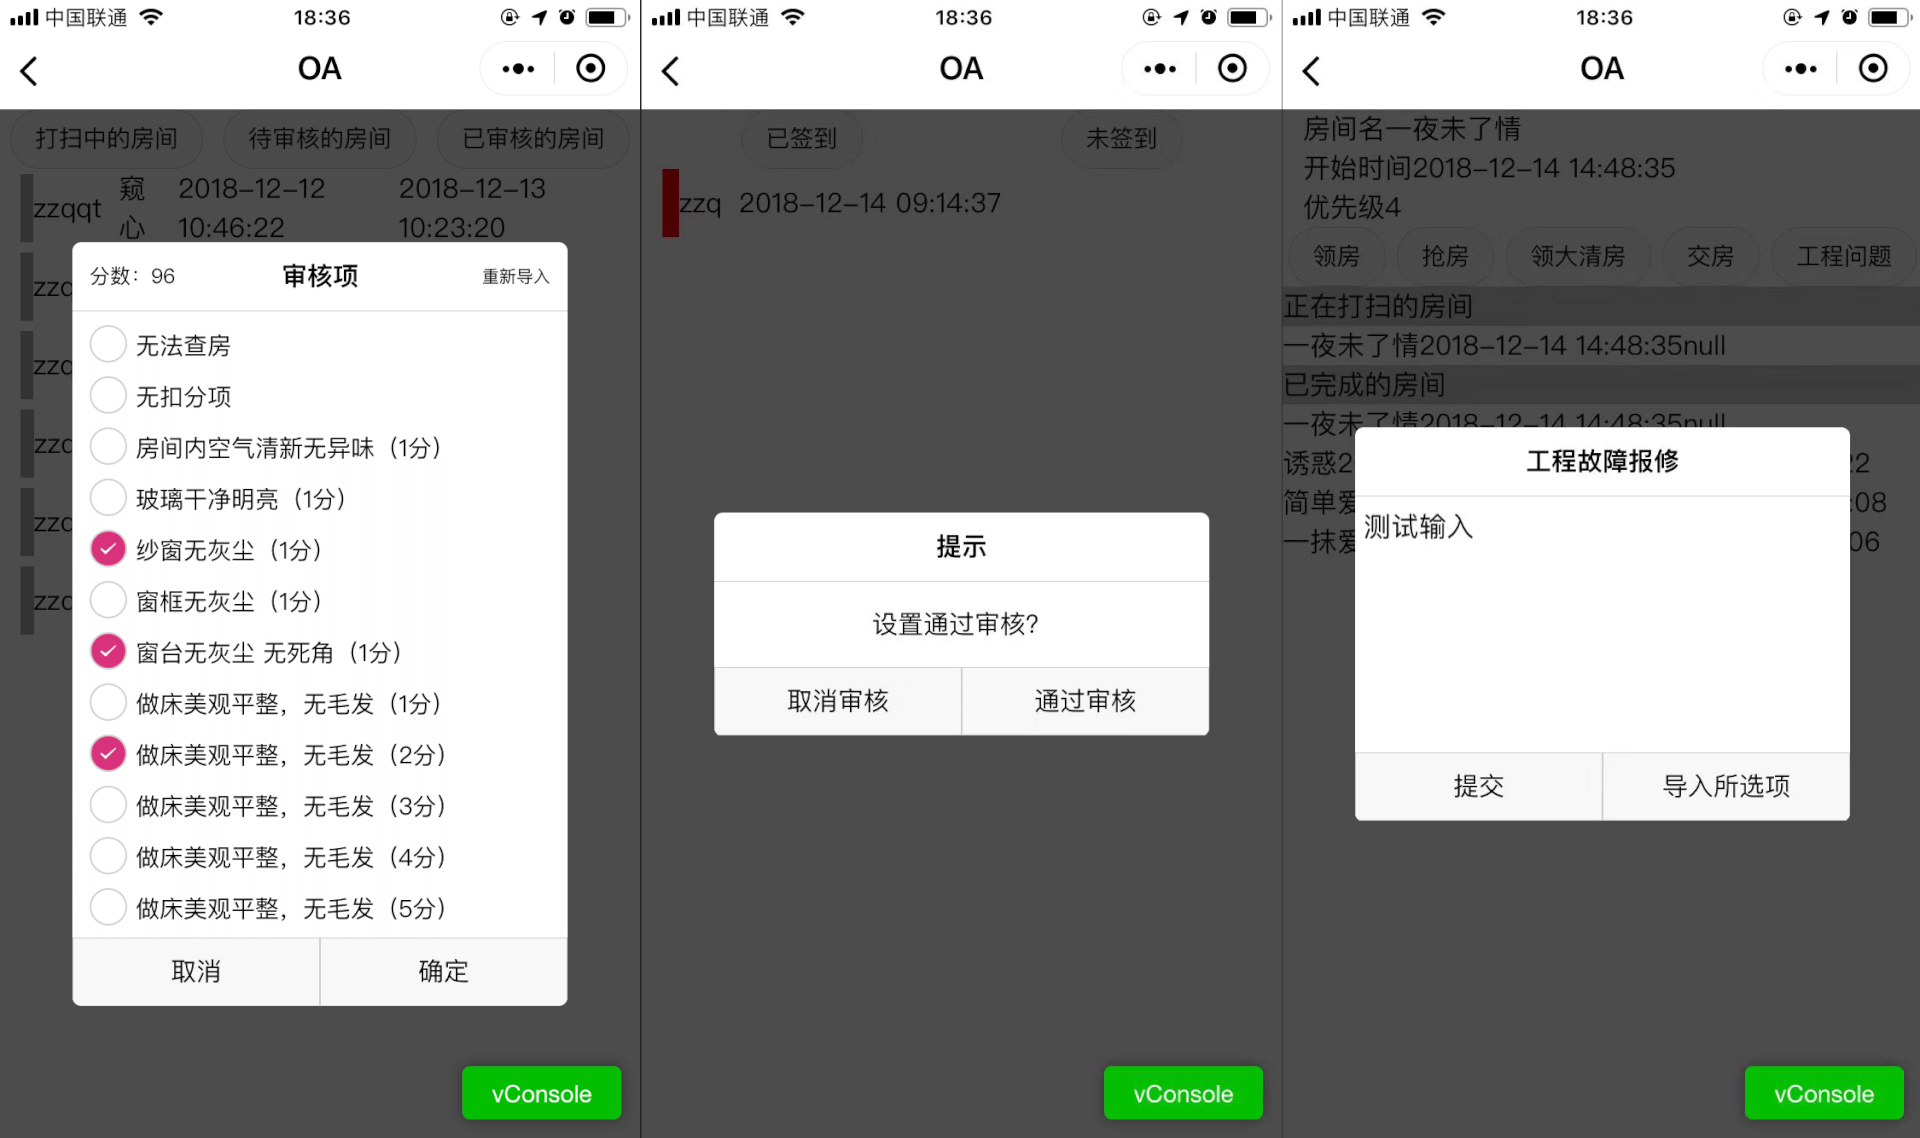
封装一个微信小程序 多功能模态框组件 Modal

自定义一个微信小程序多功能模态框,可以输入文本 textarea,可以多选列表 CheckBox

组件

/components/modal/index.js

const app = getApp()
Component({
  properties: {
    show: {
      type: Boolean,
      value: true
    },
    title: {
      type: String,
      value: '标题'
    },
    moreRight: {
      type: String,
      value: ''
    },
    moreLeft: {
      type: String,
      value: ''
    },
    content: {
      type: String,
      value: '内容'
    },
    list: {
      type: Array,
      value: [
        {
          title: '测试',
          id: ''
        }]
    },
    bg:{
      type:Boolean,
      value:true
    },
    mode: {
      type: String,
      value: 'content'
    },
    btnLeft: {
      type: String,
      value: '取消'
    },
    btnRight: {
      type: String,
      value: '确定'
    }    
  },
  data: {

  },
  
  methods: {
    _none:function(){
      //nothing
    },
    _hideDialog(){
      this.setData({
        show:false
      })
      console.log('hide')
      this.triggerEvent('tapBg')
    },

    _showDialog() {
      this.setData({
        show: true
      })
    },
    _textarea(e){
      console.log(e.detail.value)
      var value = e.detail.value
      this.triggerEvent("myInput",value)
    },
    _tapLeft() {
      this.triggerEvent("tapLeft")
    },
    _tapRight() {
      this.triggerEvent("tapRight")
    },
    _moreRight() {
      this.triggerEvent("moreRight")
    },
    _moreLeft() {
      this.triggerEvent("moreLeft")
    },
    _checkboxChange(e){
      // console.log(e.detail.value)
      var value = e.detail.value
      this.triggerEvent("select", value)
    },
  },  
})

/components/modal/index.json

{
  "component": true
}

/components/modal/index.wxml

<view class="mask" style="{{show?'z-index: 1;opacity:0.7':''}}"></view>
<view class='modalBg' bindtap='_hideDialog' wx:if="{{show}}">
  <view class="modalDlg" catchtap='_none'>
    <view class='_modalTitle'>
      <view catchtap='_moreLeft' class='_more-left'>{{moreLeft}}</view>
      <text class='_title'>{{title}}</text>
      <view catchtap='_moreRight' class='_more-right'>{{moreRight}}</view>
    </view>
    <view wx:if="{{mode=='content'}}">{{content}}</view>
    <textarea wx:if="{{mode=='textarea'}}" bindinput='_textarea' value="{{content}}">
    </textarea>
    <scroll-view scroll-y="{{true}}" wx:if="{{mode=='list'}}">
      <view class='_check-container'>
        <checkbox-group bindchange="_checkboxChange">
          <label class="checkbox" wx:for="{{list}}" wx:key="{{key}}">
            <checkbox value="{{item.id}}" />
            <text class='checkbox-text'>{{item.title}}</text>
          </label>
        </checkbox-group>
      </view>
    </scroll-view>
    <view class='button-container'>
      <button catchtap="_tapLeft">{{btnLeft}}</button>
      <button catchtap="_tapRight">{{btnRight}}</button>
    </view>
  </view>
</view>

/components/modal/index.wxss

/* 自定义模态框 */

.mask {
  width: 100%;
  height: 100%;
  position: fixed;
  top: 0;
  left: 0;
  background: #000;
  z-index: -99999;
  opacity: 0;
  transition: opacity 0.5s ease;
}

.modalBg {
  width: 100%;
  height: 100%;
  display: flex;
  flex-direction: row;
  justify-content: center;
  align-items: center;
  position: fixed;
  left: 0;
  top: 0;
  z-index: 2;
}

.modalDlg {
  width: 580rpx;
  min-height: 200rpx;
  max-height: 900rpx;
  position: relative;
  z-index: 9999;
  background-color: #fff;
  border-radius: 10rpx;
  /* display: flex;
  flex-direction: column;
  align-items: center;
  justify-content: space-between; */
  overflow: hidden;
}

.modalDlg>view {
  font-size: 30rpx;
  min-height: 60rpx;
  display: flex;
  flex-direction: row;
  justify-content: center;
  align-items: center;
}

.modalDlg>view:first-child {
  height: 80rpx;
  font-weight: 700;
  width: 100%;
  border-bottom: 1rpx solid #ccc;
  display: flex;
  flex-direction: row;
  justify-content: space-between;
  align-items: center;
}

.modalDlg>view:nth-child(2) {
  height: 100rpx;
  margin: 0 40rpx;
}

.modalDlg>view {
  display: flex;
  flex-direction: row;
  justify-content: center;
  align-items: center;
}

.modalDlg>view>button {
  width: 290rpx;
  height: 80rpx;
  font-size: 30rpx;
  border-radius: 0;
  display: flex;
  flex-direction: row;
  justify-content: center;
  align-items: center;
  border-top: 1rpx solid #ccc;
}

.modalDlg>view>button:first-child {
  border-right: 1rpx solid #ccc;
}

.modalDlg>view>button::after {
  border-radius: 0;
  border: none;
}

._modalTitle {
  display: flex;
  flex-direction: row;
  justify-content: space-between;
  align-items: center;
  position: relative;
}

._title {
  margin: 10rpx;
  text-align: center;
  width: 560rpx;
  padding: 10rpx;
}

._more-right {
  position: absolute;
  right: 20rpx;
  font-size: 20rpx;
  font-weight: 400;
}

._more-left {
  position: absolute;
  left: 20rpx;
  font-size: 25rpx;
  font-weight: 400;
}

scroll-view {
  height: inherit;
  width: inherit;
  overflow: hidden;
  max-height: 735rpx;
}

._check-container checkbox-group {
  display: flex;
  flex-direction: column;
  justify-content: flex-start;
  align-items: flex-start;
  background-color: #fefefe;
  padding-left: 20rpx;
}

使用方法

/pages/test/test.json

{
  "usingComponents": {
    "my-modal": "/components/modal/index"
  }
}

/pages/test/test.wxml

<my-modal title="{{modal.title}}" mode="{{modal.mode}}" show="{{myModalShow}}" content="{{modal.content}}" btn-left="{{modal.btnLeft}}" btn-right='{{modal.btnRight}}'  bind:tapLeft="{{modal.tapLeft}}" bind:tapRight="{{modal.tapRight}}" bind:tapBg="tapBg"></my-modal>

/pages/test/test.js

  myModalShow: function() {
    console.log('myModalShow')
    this.setData({
      myModalShow: true
    })
  },

  myModalHide: function() {
    this.setData({
      myModalShow: false,
      modal: {},
    })
  },
  showit:function(){
    var modal = {
      mode: 'content',
      content: '这是内容',
      title: '提示',
      btnLeft: '取消',
      btnRight: '确定',
      tapLeft: 'myModalHide',
      tapRight: 'do',
    }
    that.setData({
      modal: modal,
    })
    that.myModalShow()
  },

/pages/test/test.wxss


checkbox-group {
  display: flex;
  flex-direction: row;
  justify-content: space-between;
  align-items: center;
}

.checkbox {
  display: flex;
  flex-direction: row;
  justify-content: center;
  align-items: center;
}
.checkbox-text {
  font-size: 25rpx;
}

/*  重写 checkbox 样式  */

checkbox-group{
  
  font-size:28rpx;
}
checkbox-group label{
  line-height:60rpx;
}
checkbox-group label:first-child{
  margin-top:10rpx;
}

/* 未选中的 背景样式 */

checkbox .wx-checkbox-input {
  border-radius: 50%; /* 圆角 */
  width: 40rpx; /* 背景的宽 */
  height: 40rpx; /* 背景的高 */
  margin-top: -8rpx;
}

/* 选中后的 背景样式 (红色背景 无边框 可根据UI需求自己修改) */

checkbox .wx-checkbox-input.wx-checkbox-input-checked {
  /* border: none;  */
  background: rgb(217, 50, 124);
}

/* 选中后的 对勾样式 (白色对勾 可根据UI需求自己修改) */

checkbox .wx-checkbox-input.wx-checkbox-input-checked::before {
  display: flex;
  border-radius: 50%; /* 圆角 */
  width: 20rpx; /* 选中后对勾大小,不要超过背景的尺寸 */
  height: 25rpx; /* 选中后对勾大小,不要超过背景的尺寸 */
  line-height: 25rpx;
  text-align: center;
  font-size: 20rpx; /* 对勾大小 30rpx */
  color: #fff; /* 对勾颜色 白色 */
  background: transparent;
  transform: translate(-50%, -50%) scale(1);
  -webkit-transform: translate(-50%, -50%) scale(1);
}

微信小程序 左上角返回主页按钮 自定义顶部导航栏

小程序设置 "navigationStyle": "custom"后在哪里自行定义导航栏样式?

https://segmentfault.com/q/1010000015377537

在 app.json 里进行更改 "navigationStyle":"custom" 即可全屏显示,然后自定义顶部样式

{
  "pages":[
    "pages/index/index",
    "pages/logs/logs"
  ],
  "window":{
    "backgroundTextStyle":"light",
    "navigationBarBackgroundColor": "#44c9fb",
    "navigationBarTitleText": "小程序名字",
    "navigationBarTextStyle":"#fff",
    "navigationStyle":"custom"
  }
}

封装成组件可参考这篇文章

微信小程序 自定义头部导航栏 navigationStyle

https://www.jianshu.com/p/7393c800ba09

ThinkPHP 使用 WorkerMan 的一些记录

通过 composer 安装

composer require topthink/think-worker

启动

php think worker

初次使用可能会报错

[root@instance-jewlel2q www.imgram.cn]# php think worker
Starting Workerman http server...
Workerman[think] start in DEBUG mode
stream_socket_server() has been disabled for security reasons in file /home/wwwroot/www.imgram.cn/vendor/workerman/workerman/Worker.php on line 2178

原因是 stream_socket_server 函数被 php.ini 禁用

  • 运行 php –ini 找到 php.ini 文件
  • 打开 php.ini 找到 disable_functions 一项,将 stream_socket_server 禁用项删掉。
  • 重启 php-fpm。

MySQL 导出 xls

若查询语句为

SELECT *,count(*) as count FROM `youhui_activity_log` WHERE `type`="activity_21_page_index" AND `value`="c8" AND DATE_FORMAT(`create_time`,"%Y-%m-%d")= "2018-12-06" GROUP BY `key`;

则导出语句为

SELECT *,count(*) as count FROM `youhui_activity_log` WHERE `type`="activity_21_page_index" AND `value`="c8" AND DATE_FORMAT(`create_time`,"%Y-%m-%d")= "2018-12-06" GROUP BY `key` INTO OUTFILE '/usr/outsql/ac_log_2.xls'; 

MySQL 配置文件添加指定的导出目录

secure_file_priv = E:/

否则可能出现报错:

1290 - The MySQL server is running with the --secure-file-priv option so it cannot execute this statement

导出 SQL 文件

mysqldump -uroot -p wa_data cleancheckrule > /usr/outsql/clean14.sql

一些 JavaScript JS 函数

JS 模拟 POST 提交 (submit) 表单

function postcall( url, params, target){
	var tempform = document.createElement("form");
	tempform.action = url;
	tempform.method = "post";
	tempform.style.display="none"
	if(target) {
		tempform.target = target;
	}
	for (var x in params) {
		var opt = document.createElement("input");
		opt.name = x;
		opt.value = params[x];
		tempform.appendChild(opt);
	}
	var opt = document.createElement("input");
	opt.type = "submit";
	tempform.appendChild(opt);
	document.body.appendChild(tempform);
	tempform.submit();
	document.body.removeChild(tempform);
}

数组过滤重复值

//数组过滤重复值
function uniqueArr(array) {
  var n = []; //结果数组
  //从第一项开始遍历
  for (var i = 0; i < array.length; i++) {
	//如果当前数组的第i项在当前数组中第一次出现的位置不是i,
	//那么表示第i项是重复的,忽略掉。否则存入结果数组
	if (array.indexOf(array[i]) == i) n.push(array[i]);
  }
  return n;
}

删除空字符换行,过滤表格 text 中多余的空格

function Trim(str,is_global){
  var result;
  result = str.replace(/(^\s+)|(\s+$)/g,"");
  if(is_global && is_global.toLowerCase()=="g"){
	result = result.replace(/\s/g,"");
  }
  return result;
}

JS 中空的判断

alert(0 == ''); //true
alert(0 == false); //true
alert(false == ''); //true
alert(null == undefined); //true

alert(!0); //true
alert(!false); //true
alert(!undefined); //true
alert(!null); //true
alert(!''); //true

alert(0 == undefined); //false
alert(0 == null); //false
alert(false == null); //false
alert(false == undefined);//false
alert('' == null); //false
alert('' == undefined); //false

typeof(undefined) == 'undefined'
typeof(null) == 'object'
typeof("") == 'string'
typeof(0) == 'number'
typeof(false) == 'boolean'

String(undefined) -> "undefined"
String(null) -> "null"
String("") -> ""
String(0) -> "0"
String(false) -> "false"

区分 JS 中的 undefined , null , "" , 0 和 false

https://www.cnblogs.com/yangzhx/p/4019073.html

JS 移除 数组中指定元素

//首先需要找到元素的下标:
var array = [2, 5, 9];
var index = array.indexOf(5);
//使用splice函数进行移除:
if (index > -1) {
    array.splice(index, 1);
}
//splice函数的第二个参数指删除的数目。splice直接修改原数组,并把删除的所有元素以另一个新数组的方式返回。

数字前补零

function PrefixInteger(num, length) {
  return (Array(length).join('0') + num).slice(-length);
}

Toast 弹窗

function Toast(msg,duration){
  duration=isNaN(duration)?3000:duration;
  var m = document.createElement('div');
  m.innerHTML = msg;
  m.style.cssText="width: 60%;min-width: 150px;opacity: 0.7;height: 30px;color: rgb(255, 255, 255);line-height: 30px;text-align: center;border-radius: 5px;position: fixed;top: 40%;left: 20%;z-index: 999999;background: rgb(0, 0, 0);font-size: 12px;";
  document.body.appendChild(m);
  setTimeout(function() {
    var d = 0.5;
    m.style.webkitTransition = '-webkit-transform ' + d + 's ease-in, opacity ' + d + 's ease-in';
    m.style.opacity = '0';
    setTimeout(function() { document.body.removeChild(m) }, d * 1000);
  }, duration);
}

复制文本

//复制文本
function copy (id, attr='innerHTML') {
  let target = null;
  if (attr) {
    target = document.createElement('div');
    target.id = 'tempTarget';
    target.style.opacity = '0';
    if (id) {
      let curNode = document.querySelector('#' + id);
      target.innerText = curNode[attr];
    } else {
      target.innerText = attr;
    }
    document.body.appendChild(target);
  } else {
    target = document.querySelector('#' + id);
  }
  try {
    let range = document.createRange();
    range.selectNode(target);
    window.getSelection().removeAllRanges();
    window.getSelection().addRange(range);
    document.execCommand('copy');
    window.getSelection().removeAllRanges();
    console.log('复制成功:' + range)
  } catch (e) {
    console.log('复制失败')
  }
  if (attr) {
    // remove temp target
    target.parentElement.removeChild(target);
  }
}

获得链接地址的参数

function getQueryString(name,link=''){
  console.log(link)
  var reg = new RegExp("(^|&)"+ name +"=([^&]*)(&|$)");
  if(link){
    var num=link.indexOf("?");
    link=link.substr(num+1);
    var r = link.match(reg);
  }else{
    var r = window.location.search.substr(1).match(reg);
  }
  if(r!=null)return  unescape(r[2]); return null;
}

HTML 标签获取 图片地址

img_src: function (str){
  var imgReg = /<img.*?(?:>|\/>)/gi;
  var srcReg = /src=[\'\"]?([^\'\"]*)[\'\"]?/i;
  var arr = str.match(imgReg);    
  var list = []
  for(var i = 0; i < arr.length; i++) {
    var src = arr[i].match(srcReg);
    //获取图片地址
    if (src[1]) {
    list.push(src[1])
    }
    //当然你也可以替换src属性
    if (src[0]) {
      var t = src[0].replace(/src/i, "href");
    }
  }
  console.log(list)
  return list;
},

截取文件后缀

file_ext:function (name){
  let fileName = name.lastIndexOf(".");//取到文件名开始到最后一个点的长度
  let fileNameLength = name.length;//取到文件名长度
  let fileFormat = name.substring(fileName + 1, fileNameLength);//截
  console.log(fileFormat);
  return fileFormat
},

不刷新页面修改地址栏

var stateObject = {};
var title = "修改地址";
var newUrl = '/view/fontface4.html';
//修改地址栏中的地址,后退时返回当前页
history.pushState(stateObject, title, newUrl);
//修改地址栏中的地址,后退时返回前一页
history.replaceState(stateObject, title, newUrl);

jQuery Post 跳转

$.extend({
  StandardPost:function(url,args){
    console.log(args)
    var body = $(document.body),
      form = $("<form method='post'></form>"),
      input;
    form.attr({"action":url});
    $.each(args,function(key,value){
      input = $("<input type='hidden'>");
      input.attr({"name":key});
      input.val(value);
      form.append(input);
    });

    form.appendTo(document.body);
    form.submit();
    document.body.removeChild(form[0]);
  }
});
//使用
$.StandardPost(url,{data:'test'});

jQuery 模拟长按

$("#id").on({
  touchstart: function(e) {
    // 长按事件触发
    timeOutEvent = setTimeout(function() {
      timeOutEvent = 0;
      console.log("长按事件")
    }, 1000);
  },
  touchmove: function() {
    clearTimeout(timeOutEvent);
    timeOutEvent = 0;
  },
  touchend: function() {
    clearTimeout(timeOutEvent);
    timeOutEvent = 0;
    return false;
  }
})

指定日期的上个月,下个月

//下个月
const getNextMonth = function(date) {
  var arr = date.split('-');
  var year = arr[0]; //获取当前日期的年份
  var month = arr[1]; //获取当前日期的月份
  var day = arr[2]; //获取当前日期的日
  var days = new Date(year, month, 0);
  days = days.getDate(); //获取当前日期中的月的天数
  var year2 = year;
  var month2 = parseInt(month) + 1;
  if (month2 == 13) {
    year2 = parseInt(year2) + 1;
    month2 = 1;
  }
  var day2 = day;
  var days2 = new Date(year2, month2, 0);
  days2 = days2.getDate();
  if (day2 > days2) {
    day2 = days2;
  }
  if (month2 < 10) {
    month2 = '0' + month2;
  }

  var t2 = year2 + '-' + month2 + '-' + day2;
  return t2;
}
//上个月
const getPreMonth = function (date) {
  var arr = date.split('-');
  var year = arr[0]; //获取当前日期的年份
  var month = arr[1]; //获取当前日期的月份
  var day = arr[2]; //获取当前日期的日
  var days = new Date(year, month, 0);
  days = days.getDate(); //获取当前日期中月的天数
  var year2 = year;
  var month2 = parseInt(month) - 1;
  if (month2 == 0) {
    year2 = parseInt(year2) - 1;
    month2 = 12;
  }
  var day2 = day;
  var days2 = new Date(year2, month2, 0);
  days2 = days2.getDate();
  if (day2 > days2) {
    day2 = days2;
  }
  if (month2 < 10) {
    month2 = '0' + month2;
  }
  var t2 = year2 + '-' + month2 + '-' + day2;
  return t2;
}

HTML 锚点跳转平滑动画

    $('a[href*=#],area[href*=#]').click(function() {
        if (location.pathname.replace(/^\//, '') == this.pathname.replace(/^\//, '') && location.hostname == this.hostname) {
            var $target = $(this.hash);
            $target = $target.length && $target || $('[name=' + this.hash.slice(1) + ']');
            if ($target.length) {
                var targetOffset = $target.offset().top;
                $('html,body').animate({
                        scrollTop: targetOffset
                    },
                    200);
                return false;
            }
        }
    });

yum 安装 MongoDB 3.6

安装步骤

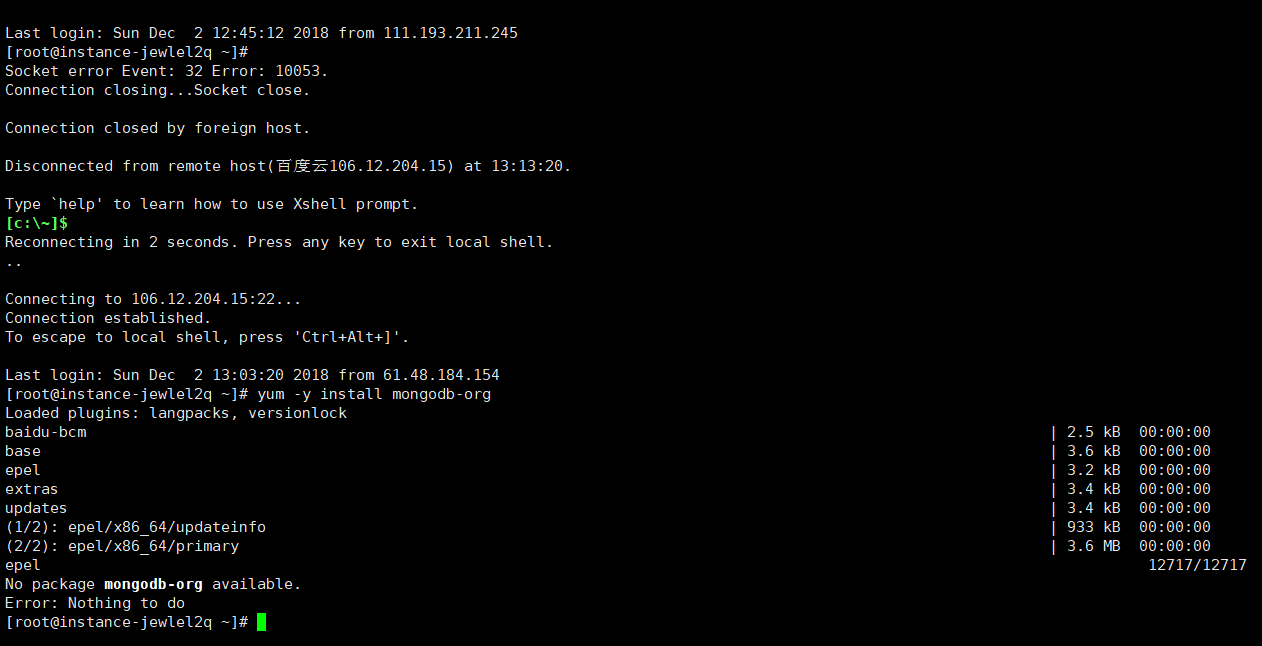
CentOS7 直接 yum 安装 会出现 No package mongodb-org available.

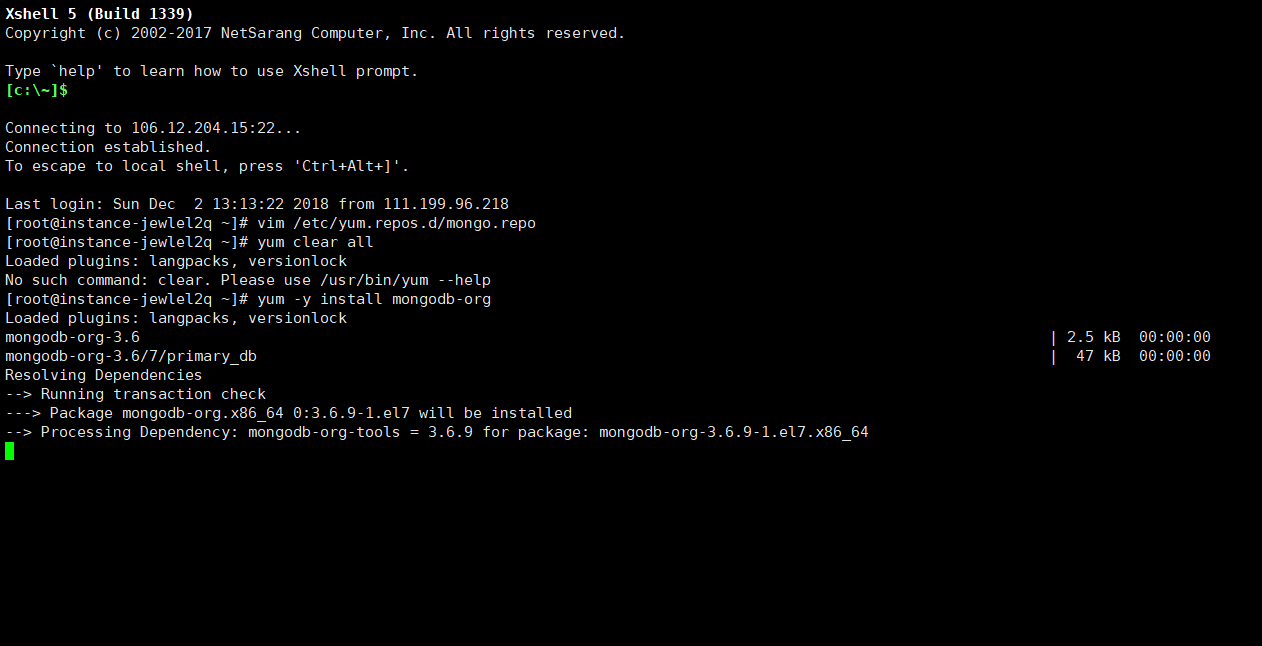
首先,编辑 MongoDB 安装源

vim /etc/yum.repos.d/mongo.repo

然后粘贴如下内容并保存退出

[mongodb-org-3.6]
name=MongoDB Repository
baseurl=https://repo.mongodb.org/yum/redhat/$releasever/mongodb-org/3.6/x86_64/
gpgcheck=1
enabled=1
gpgkey=https://www.mongodb.org/static/pgp/server-3.6.asc

清理缓存

yum clear all

然后进行安装

yum -y install mongodb-org

配置文件位置

vim /etc/mongod.conf 

修改 bindIp: 0.0.0.0 可以外部访问

重启 mongod 服务

systemctl restart mongod.service 

客户端

客户端可使用 NoSQL Manager for MongoDB Freeware,下载地址:

https://www.mongodbmanager.com/download

如无法连接检查防火墙是否放行 27017 端口

参考文献

Centos 下安装配置 Mongodb3.6

https://www.cnblogs.com/hackyo/p/7967170.html

Window 下安装直接下载安装包

Windows 平台安装 MongoDB

http://www.runoob.com/mongodb/mongodb-window-install.html

Windows 启动 mongodb

mongod.exe --dbpath c:\home\db