图片多了太占空间,之前项目的图片有 10G,删掉可以留着占空间,近期就写了个图片压缩的程序 压缩 JPG/JPEG/BMP/PNG/GIF,将文件夹里的文件扫描添加至队列,然后执行计划任务将六万多张图片压缩完成。
仅部分图片由于本身格式存在问题无法压缩成功。
原本不压缩尺寸只压缩格式,发现还是需要占3个多G,后将宽度大于400的压缩至400,减少至不到2G


学习日志 LIUGUOFENG
图片多了太占空间,之前项目的图片有 10G,删掉可以留着占空间,近期就写了个图片压缩的程序 压缩 JPG/JPEG/BMP/PNG/GIF,将文件夹里的文件扫描添加至队列,然后执行计划任务将六万多张图片压缩完成。
仅部分图片由于本身格式存在问题无法压缩成功。
原本不压缩尺寸只压缩格式,发现还是需要占3个多G,后将宽度大于400的压缩至400,减少至不到2G
操作逻辑感人
1 无法识别文件夹

2 正在压缩时添加新文件会替换掉现在的压缩列队
3 开启裁剪缩放默认为 1*1,手动修改为自己的设定如 400*400,退出软件在再进入会变成 1*1,且裁剪缩放为开启。如果你选择了替换原图,那么恭喜你了
4 文件过多会超级慢,一个五万文件的文件夹(含子目录),扫描有将近一个小时(就算用 PHP 操作也不会超过 30s),扫描完成后默认先压缩文件夹……然后提示你文件类型出错,而且你的界面会很卡,想看下滚动条都难
5 安装过程不会自动判断是否需要安装额外的库,如果你没有选中且本机原先没有,那么它会一直安装失败
6 有时会卡住。文件普普通通但就是不压缩
先写这么多
访问网址(将来可能会变)
演示如下
https://file.liuguofeng.com/video/Video_2018-11-14_204158_x264.mp4
下载会慢,因为 1Mb 小水管
Gifsicle 官网
https://www.lcdf.org/gifsicle/
cd ~
wget https://www.lcdf.org/gifsicle/gifsicle-1.91.tar.gz
tar -zxvf gifsicle-1.91.tar.gz
cd gifsicle-1.91/
./configure
make
make install
使用:
gifsicle -O3 path.gif -o newpath.gif
[root@instance-jewlel2q tmp]# gifsicle --sinfo x.gif
* x.gif 98 images
  logical screen 800x450
  global color table [256]
  background 0
  loop forever
  + image #0 800x450
    compressed size 133044
    comment Edited with ezgif.com online GIF maker
    disposal asis delay 0.10s
  + image #1 800x450
    compressed size 133243
    local color table [256]
    disposal asis delay 0.10s
  + image #2 800x450
    compressed size 134192
    local color table [256]
    disposal asis delay 0.10s
  + image #3 800x450
    compressed size 130221
    local color table [256]
    disposal asis delay 0.10s
[root@instance-jewlel2q tmp]# gifsicle -O3 x.gif -o x1.gif --resize-fit 400
gifsicle: invalid dimensions ‘400’ (want WxH)
gifsicle: warning: too many colors, using local colormaps
  (You may want to try ‘--colors 256’.)
[root@instance-jewlel2q tmp]# gifsicle -h
'Gifsicle' manipulates GIF images. Its most common uses include combining
single images into animations, adding transparency, optimizing animations for
space, and printing information about GIFs.

Usage: gifsicle [OPTION | FILE | FRAME]...

Mode options: at most one, before any filenames.
  -m, --merge                   Merge mode: combine inputs, write stdout.
  -b, --batch                   Batch mode: modify inputs, write back to
                                same filenames.
  -e, --explode                 Explode mode: write N files for each input,
                                one per frame, to 'input.frame-number'.
  -E, --explode-by-name         Explode mode, but write 'input.name'.

General options: Also --no-OPTION for info and verbose.
  -I, --info                    Print info about input GIFs. Two -I's means
                                normal output is not suppressed.
      --color-info, --cinfo     --info plus colormap details.
      --extension-info, --xinfo --info plus extension details.
      --size-info, --sinfo      --info plus compression information.
  -V, --verbose                 Prints progress information.
  -h, --help                    Print this message and exit.
      --version                 Print version number and exit.
  -o, --output FILE             Write output to FILE.
  -w, --no-warnings             Don't report warnings.
      --no-ignore-errors        Quit on very erroneous input GIFs.
      --conserve-memory         Conserve memory at the expense of speed.
      --multifile               Support concatenated GIF files.

Frame selections:               #num, #num1-num2, #num1-, #name

Frame change options:
  --delete FRAMES               Delete FRAMES from input.
  --insert-before FRAME GIFS    Insert GIFS before FRAMES in input.
  --append GIFS                 Append GIFS to input.
  --replace FRAMES GIFS         Replace FRAMES with GIFS in input.
  --done                        Done with frame changes.

Image options: Also --no-OPTION and --same-OPTION.
  -B, --background COL          Make COL the background color.
      --crop X,Y+WxH, --crop X,Y-X2,Y2
                                Crop the image.
      --crop-transparency       Crop transparent borders off the image.
      --flip-horizontal, --flip-vertical
                                Flip the image.
  -i, --interlace               Turn on interlacing.
  -S, --logical-screen WxH      Set logical screen to WxH.
  -p, --position X,Y            Set frame position to (X,Y).
      --rotate-90, --rotate-180, --rotate-270, --no-rotate
                                Rotate the image.
  -t, --transparent COL         Make COL transparent.

Extension options:
      --app-extension N D       Add an app extension named N with data D.
  -c, --comment TEXT            Add a comment before the next frame.
      --extension N D           Add an extension number N with data D.
  -n, --name TEXT               Set next frame's name.
      --no-comments, --no-names, --no-extensions
                                Remove comments (names, extensions) from input.
Animation options: Also --no-OPTION and --same-OPTION.
  -d, --delay TIME              Set frame delay to TIME (in 1/100sec).
  -D, --disposal METHOD         Set frame disposal to METHOD.
  -l, --loopcount[=N]           Set loop extension to N (default forever).
  -O, --optimize[=LEVEL]        Optimize output GIFs.
  -U, --unoptimize              Unoptimize input GIFs.
  -j, --threads[=THREADS]       Use multiple threads to improve speed.

Whole-GIF options: Also --no-OPTION.
      --careful                 Write larger GIFs that avoid bugs in other
                                programs.
      --change-color COL1 COL2  Change COL1 to COL2 throughout.
  -k, --colors N                Reduce the number of colors to N.
      --color-method METHOD     Set method for choosing reduced colors.
  -f, --dither                  Dither image after changing colormap.
      --gamma G                 Set gamma for color reduction [2.2].
      --resize WxH              Resize the output GIF to WxH.
      --resize-width W          Resize to width W and proportional height.
      --resize-height H         Resize to height H and proportional width.
      --resize-fit WxH          Resize if necessary to fit within WxH.
      --scale XFACTOR[xYFACTOR] Scale the output GIF by XFACTORxYFACTOR.
      --resize-method METHOD    Set resizing method.
      --resize-colors N         Resize can add new colors up to N.
      --transform-colormap CMD  Transform each output colormap by shell CMD.
      --use-colormap CMAP       Set output GIF's colormap to CMAP, which can
                                be 'web', 'gray', 'bw', or a GIF file.

Report bugs to <ekohler@gmail.com>.
Too much information? Try 'gifsicle --help | more'.官网
https://pngquant.org/
cd ~
git clone git://github.com/kornelski/pngquant.git
cd pngquant
./configure
make
make install

原文:通过图像压缩优化降低网站页面大小
http://www.jiajianhudong.com/article/56.html
How Image Optimization Decreased my Website’s Page Weight by 62%
https://medium.freecodecamp.org/image-optimization-558d9f449e3
图像是在网络上提供的最基本的内容类型之一。他们说一张图片胜过千言万语。但如果你不小心的话,它也可能值几兆。
因此,虽然网络图像需要清晰明快,但它们也必须以可管理的尺寸交付,以便加载时间保持很小并且数据使用保持在可接受的水平。
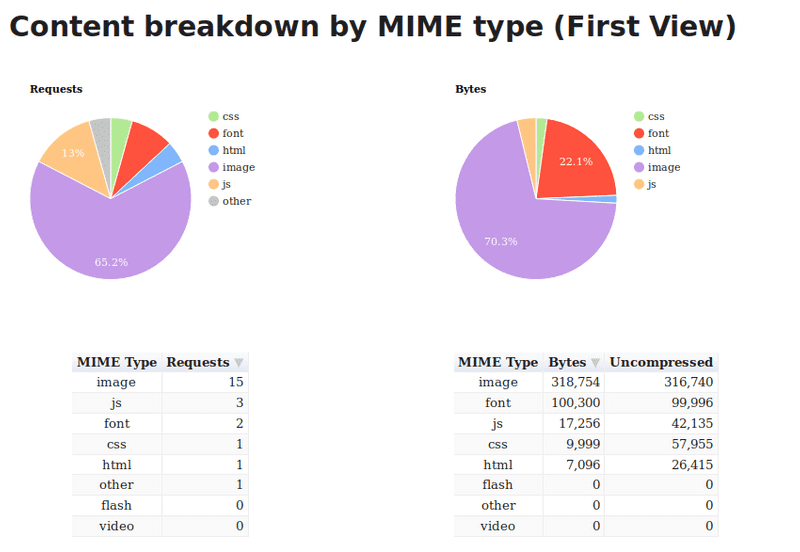
在我的网站上,我注意到我的主页的页面重量超过了1.1MB,图像的重量增加了88%。我也意识到我正在提供比他们需要的更大的图像(就分辨率而言)。显然,还有很大的改进空间。

我开始阅读Addy Osmani 的优秀Essential Image Optimization电子书,并开始在我的网站上实施他的建议。然后我对响应式图像进行了一些研究,并将其应用于此。
这使页面重量降至445kb。页面重量减少约62%!
本文是关于描述我将主页的页面权重提升到更易管理的水平的步骤。
压缩图像就是在保持可接受的视觉质量水平的同时减小文件大小。要压缩我网站上的图像,imagemin是我的首选工具。
要使用imagemin,请确保已安装Node.js然后打开终端窗口,cd进入项目的文件夹并运行以下命令:
npm install imagemin
然后创建一个名为的新文件imagemin.js并粘贴到以下内容中:
const imagemin = require('imagemin');
const PNGImages ='assets/images/*.png';
const JPEGImages ='assets/images/*.jpg';
const output ='build/images';
随意更改PNGImages,JPEGImages并output匹配您的项目的结构。
要执行任何压缩,您需要根据要压缩的图像类型提取一些插件。
为了压缩JPEG图像,我使用了Mozilla 的MozJPEG工具,它可以通过imagemin- mozjpeg作为Imagemin插件使用。您可以通过运行以下命令来安装它:
npm install imagemin-mozjpeg
然后将以下内容添加到您的imagemin.js文件中:
const imageminMozjpeg = require('imagemin-mozjpeg');
const
  optimiseJPEGImages =()=> imagemin([JPEGImages],输出,{
    plugins:[
      imageminMozjpeg({
        quality:70,
      }),
    ]
  });
optimiseJPEGImages().catch(error => console.log(error));
您可以通过node imagemin.js在终端中运行来运行脚本。这将处理所有JPEG图像,并将优化版本放在build/images文件夹中。
我发现,设置quality以70产生大部分足够好的图像,但您的里程可能会有所不同。根据您的需要尝试使用该值。
MozJPEG默认情况下会生成渐进式JPEG,这会导致图像从低分辨率逐渐加载到更高分辨率,直到图像完全加载为止。由于它们的编码方式,它们也往往略小于基线JPEG。
您可以使用Sindre Sorhus的这个漂亮的命令行工具来检查JPEG图像是否是渐进的。
的优点和缺点使用渐进式JPEG已经由阿迪·奥斯马尼得到了很好的证明。对我来说,我觉得专业人士超过了缺点,所以我坚持默认设置。
如果你喜欢使用基线JPEG文件,而不是,您可以设置progressive到false在选择对象。此外,请务必重新访问imagemin-mozjpeg页面以查看您可以修改的其他可用设置。
pngquant是我优化PNG图像的首选工具。你可以通过imagemin-pngquant使用它:
npm install imagemin-pngquant
然后将以下内容添加到您的imagemin.js文件中:
const imageminPngquant = require('imagemin-pngquant');
const
  optimisePNGImages =()=> imagemin([PNGImages],output,{
    plugins:[
      imageminPngquant({quality:'65 -80'})
    ],
  });
optimiseJPEGImages()
  .then(()=> optimisePNGImages())
  .catch(error=>console.log(error));
我发现一个quality水平65-80提供文件大小和图像质量之间的良好平衡。
通过这些设置,我能够从913 KB到187 KB获取我的网站的屏幕截图,没有任何可辨别的视觉质量损失。百分比减少了79%!
这是两个文件。看看并自己判断:
WebP是Google推出的一种相对较新的格式,旨在通过编码无损和有损格式的图像来提供较小的文件大小,使其成为JPEG和PNG的绝佳替代品。
WebP图像的视觉质量通常与JPEG和PNG相当,但通常文件大小要小得多。例如,当我将屏幕截图从上面转换为WebP时,我得到了一个88 KB的文件,其质量与913 KB的原始图像相当。减少90%!
看看这三张图片。你能分辨出来吗?
就个人而言,我认为视觉质量具有可比性,您所获得的节省很难被忽视。
现在我们已经确定了尽可能使用WebP格式的价值,重要的是要注意 - 此时 - 它不能完全取代JPEG和PNG,因为浏览器中的WebP支持并不普遍。
在撰写本文时,Firefox,Safari和Edge是没有WebP支持的着名浏览器。
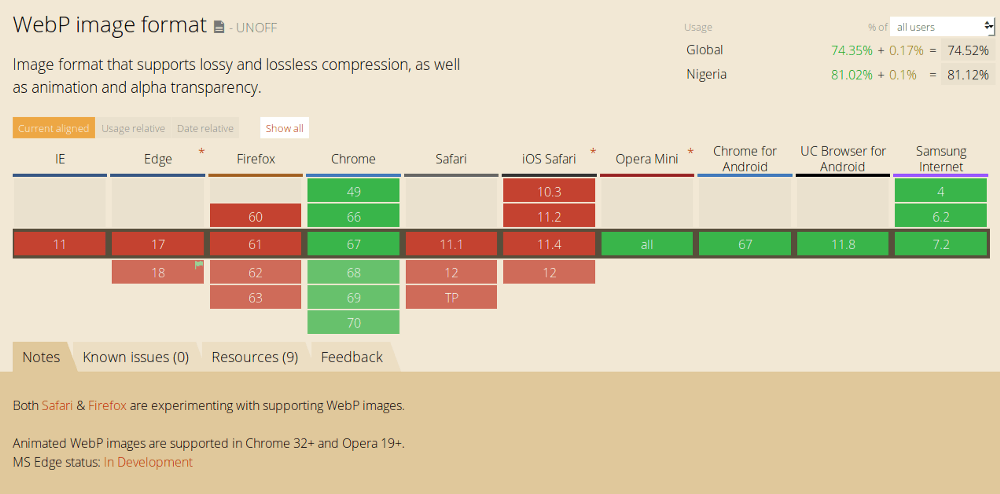
然而,根据caniuse.com,全球超过70%的用户使用支持WebP的浏览器。这意味着,通过提供WebP图像,您可以为大约70%的客户提高网页速度。
我们来看看在Web上提供WebP图像的确切步骤。
使用imagemin-webp插件将JPEG和PNG图像转换为WebP非常简单。
通过在终端中运行以下命令来安装它:
npm install imagemin-webp
然后将以下内容添加到您的imagemin.js文件中:
const imageminWebp = require('imagemin-webp');
const convertPNGToWebp =()=>
  imagemin([PNGImages],output,{
    use:[
      imageminWebp({
        quality:85,
      }),
    ]
  });
const convertJPGToWebp =()=>
  imagemin([JPGImages],output,{
    use:[
      imageminWebp({
        quality:75,
      }),
    ]
  });
optimiseJPEGImages()
  .then(()=> optimisePNGImages())
  .then(()=> convertPNGToWebp())
  .then(()=> convertJPGToWebp())
  .catch(error =>console.log(error));
我发现设置quality为85生成WebP图像,其质量与PNG等效,但大幅缩小。对于JPEG文件,我发现,设置quality到75给我的视觉质量和文件大小之间的平衡得体。
说实话,我还在尝试这些价值观,所以不要把它们作为推荐。并确保重新检查imagemin-webp页面以查看可供您使用的其他选项。
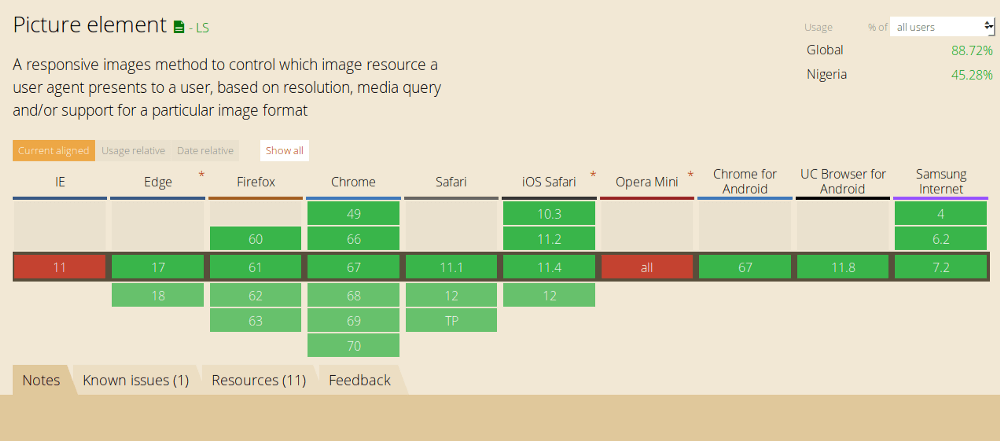
获得WebP图像后,您可以使用以下标记将它们提供给可以使用它们的浏览器,同时为没有WebP支持的浏览器提供等效(优化)JPEG或PNG后备。
<picture>
    <source srcset =“sample_image.webp”type =“image/webp”>
    <source srcset =“sample_image.jpg”type =“image/jpg”>
    <img src =“sample_image.jpg”alt =“” >
</ picture>
使用此标记,了解image/webp媒体类型的浏览器将下载WebP变体并显示它,而其他浏览器将下载JPEG变体。
任何不理解的浏览器都<picture>将跳过所有source并加载底部标签src属性中定义的所有内容img。因此,我们通过为所有类浏览器提供支持来逐步增强页面。
请注意,在所有情况下,img标记都是实际呈现给页面的内容,因此它确实是语法的必需部分。如果遗漏img标记,则不会渲染任何图像。
该<picture>标记和所有的source内部规定就在那里,这样浏览器就可以选择要使用的图像的变形。选择源图像后,其URL将被输入img标签,这就是显示的内容。
这意味着您不需要设置样式<picture>或source标记,因为浏览器不会呈现这些样式。因此,您可以img像以前一样继续使用标签样式。
正如您所看到的,优化图像以便在Web上使用的过程并不复杂,可以通过减少页面加载时间为您的客户带来更好的用户体验。所以今天花几分钟时间在您的网站上进行一些图像优化。如果您有其他建议,请务必在评论或Twitter上提及。
官方教程
https://github.com/mozilla/mozjpeg/blob/master/BUILDING.txt
源码地址
https://github.com/mozilla/mozjpeg/releases
需 nasm 环境
yum -y install build-essential nasm以 3.3.1 为例
cd ~
wget -O "mozjpeg-3.3.1.tar.gz" https://codeload.github.com/mozilla/mozjpeg/tar.gz/v3.3.1
tar -zxvf mozjpeg-v3.3.1.tar.gz
cd mozjpeg-3.3.1
autoreconf -fiv
./configure
make
make install
安装完成 目录
/opt/mozjpeg/bin
-rwxr-xr-x 1 root root 56752 Nov  2 23:26 cjpeg
-rwxr-xr-x 1 root root 45792 Nov  2 23:26 djpeg
-rwxr-xr-x 1 root root 53424 Nov  2 23:26 jpegtran
-rwxr-xr-x 1 root root 13536 Nov  2 23:26 rdjpgcom
-rwxr-xr-x 1 root root 64456 Nov  2 23:26 tjbench
-rwxr-xr-x 1 root root 13552 Nov  2 23:26 wrjpgcom
使用示例
/opt/mozjpeg/bin/cjpeg -quality 80 a.jpg > a1.jpg
图片由 4.9MB 压缩至 1.4MB
帮助文档
[root@instance-jewlel2q bin]# ./cjpeg -h
./cjpeg: unknown option 'h'
usage: ./cjpeg [switches] [inputfile]
Switches (names may be abbreviated):
  -quality N[,...]   Compression quality (0..100; 5-95 is most useful range,
                     default is 75)
  -grayscale     Create monochrome JPEG file
  -rgb           Create RGB JPEG file
  -optimize      Optimize Huffman table (smaller file, but slow compression, enabled by default)
  -progressive   Create progressive JPEG file (enabled by default)
  -baseline      Create baseline JPEG file (disable progressive coding)
  -targa         Input file is Targa format (usually not needed)
  -revert        Revert to standard defaults (instead of mozjpeg defaults)
  -fastcrush     Disable progressive scan optimization
  -dc-scan-opt   DC scan optimization mode
                 - 0 One scan for all components
                 - 1 One scan per component (default)
                 - 2 Optimize between one scan for all components and one scan for 1st component
                     plus one scan for remaining components
  -notrellis     Disable trellis optimization
  -trellis-dc    Enable trellis optimization of DC coefficients (default)
  -notrellis-dc  Disable trellis optimization of DC coefficients
  -tune-psnr     Tune trellis optimization for PSNR
  -tune-hvs-psnr Tune trellis optimization for PSNR-HVS (default)
  -tune-ssim     Tune trellis optimization for SSIM
  -tune-ms-ssim  Tune trellis optimization for MS-SSIM
Switches for advanced users:
  -noovershoot   Disable black-on-white deringing via overshoot
  -arithmetic    Use arithmetic coding
  -dct int       Use integer DCT method (default)
  -dct fast      Use fast integer DCT (less accurate)
  -dct float     Use floating-point DCT method
  -quant-baseline Use 8-bit quantization table entries for baseline JPEG compatibility
  -quant-table N Use predefined quantization table N:
                 - 0 JPEG Annex K
                 - 1 Flat
                 - 2 Custom, tuned for MS-SSIM
                 - 3 ImageMagick table by N. Robidoux
                 - 4 Custom, tuned for PSNR-HVS
                 - 5 Table from paper by Klein, Silverstein and Carney
  -restart N     Set restart interval in rows, or in blocks with B
  -smooth N      Smooth dithered input (N=1..100 is strength)
  -maxmemory N   Maximum memory to use (in kbytes)
  -outfile name  Specify name for output file
  -memdst        Compress to memory instead of file (useful for benchmarking)
  -verbose  or  -debug   Emit debug output
  -version       Print version information and exit
Switches for wizards:
  -qtables FILE  Use quantization tables given in FILE
  -qslots N[,...]    Set component quantization tables
  -sample HxV[,...]  Set component sampling factors
  -scans FILE    Create multi-scan JPEG per script FILE
[root@instance-jewlel2q bin]# ./djpeg -h
usage: ./djpeg [switches] [inputfile]
Switches (names may be abbreviated):
  -colors N      Reduce image to no more than N colors
  -fast          Fast, low-quality processing
  -grayscale     Force grayscale output
  -rgb           Force RGB output
  -rgb565        Force RGB565 output
  -scale M/N     Scale output image by fraction M/N, eg, 1/8
  -bmp           Select BMP output format (Windows style)
  -gif           Select GIF output format
  -os2           Select BMP output format (OS/2 style)
  -pnm           Select PBMPLUS (PPM/PGM) output format (default)
  -targa         Select Targa output format
Switches for advanced users:
  -dct int       Use integer DCT method (default)
  -dct fast      Use fast integer DCT (less accurate)
  -dct float     Use floating-point DCT method
  -dither fs     Use F-S dithering (default)
  -dither none   Don't use dithering in quantization
  -dither ordered  Use ordered dither (medium speed, quality)
  -map FILE      Map to colors used in named image file
  -nosmooth      Don't use high-quality upsampling
  -onepass       Use 1-pass quantization (fast, low quality)
  -maxmemory N   Maximum memory to use (in kbytes)
  -outfile name  Specify name for output file
  -memsrc        Load input file into memory before decompressing
  -skip Y0,Y1    Decompress all rows except those between Y0 and Y1 (inclusive)
  -crop WxH+X+Y  Decompress only a rectangular subregion of the image
  -verbose  or  -debug   Emit debug output
  -version       Print version information and exit
[root@instance-jewlel2q bin]# ./jpegtran -h
usage: ./jpegtran [switches] [inputfile]
Switches (names may be abbreviated):
  -copy none     Copy no extra markers from source file
  -copy comments Copy only comment markers (default)
  -copy all      Copy all extra markers
  -optimize      Optimize Huffman table (smaller file, but slow compression, enabled by default)
  -progressive   Create progressive JPEG file (enabled by default)
  -revert        Revert to standard defaults (instead of mozjpeg defaults)
  -fastcrush     Disable progressive scan optimization
Switches for modifying the image:
  -crop WxH+X+Y  Crop to a rectangular subarea
  -grayscale     Reduce to grayscale (omit color data)
  -flip [horizontal|vertical]  Mirror image (left-right or top-bottom)
  -perfect       Fail if there is non-transformable edge blocks
  -rotate [90|180|270]         Rotate image (degrees clockwise)
  -transpose     Transpose image
  -transverse    Transverse transpose image
  -trim          Drop non-transformable edge blocks
Switches for advanced users:
  -arithmetic    Use arithmetic coding
  -restart N     Set restart interval in rows, or in blocks with B
  -maxmemory N   Maximum memory to use (in kbytes)
  -outfile name  Specify name for output file
  -verbose  or  -debug   Emit debug output
  -version       Print version information and exit
Switches for wizards:
  -scans FILE    Create multi-scan JPEG per script FILE
[root@instance-jewlel2q bin]# ./rdjpgcom -h
rdjpgcom displays any textual comments in a JPEG file.
Usage: ./rdjpgcom [switches] [inputfile]
Switches (names may be abbreviated):
  -raw        Display non-printable characters in comments (unsafe)
  -verbose    Also display dimensions of JPEG image
[root@instance-jewlel2q bin]# ./tjbench -h

USAGE: ./tjbench
       <Inputfile (BMP|PPM)> <Quality> [options]

       ./tjbench
       <Inputfile (JPG)> [options]

Options:

-alloc = Dynamically allocate JPEG image buffers
-bmp = Generate output images in Windows Bitmap format (default = PPM)
-bottomup = Test bottom-up compression/decompression
-tile = Test performance of the codec when the image is encoded as separate
     tiles of varying sizes.
-rgb, -bgr, -rgbx, -bgrx, -xbgr, -xrgb =
     Test the specified color conversion path in the codec (default = BGR)
-cmyk = Indirectly test YCCK JPEG compression/decompression (the source
     and destination bitmaps are still RGB.  The conversion is done
     internally prior to compression or after decompression.)
-fastupsample = Use the fastest chrominance upsampling algorithm available in
     the underlying codec
-fastdct = Use the fastest DCT/IDCT algorithms available in the underlying
     codec
-accuratedct = Use the most accurate DCT/IDCT algorithms available in the
     underlying codec
-subsamp <s> = When testing JPEG compression, this option specifies the level
     of chrominance subsampling to use (<s> = 444, 422, 440, 420, 411, or
     GRAY).  The default is to test Grayscale, 4:2:0, 4:2:2, and 4:4:4 in
     sequence.
-quiet = Output results in tabular rather than verbose format
-yuv = Test YUV encoding/decoding functions
-yuvpad <p> = If testing YUV encoding/decoding, this specifies the number of
     bytes to which each row of each plane in the intermediate YUV image is
     padded (default = 1)
-scale M/N = Scale down the width/height of the decompressed JPEG image by a
     factor of M/N (M/N = 2/1, 15/8, 7/4, 13/8, 3/2, 11/8, 5/4, 9/8, 1/1,
     7/8, 3/4, 5/8, 1/2, 3/8, 1/4, or 1/8)
-hflip, -vflip, -transpose, -transverse, -rot90, -rot180, -rot270 =
     Perform the corresponding lossless transform prior to
     decompression (these options are mutually exclusive)
-grayscale = Perform lossless grayscale conversion prior to decompression
     test (can be combined with the other transforms above)
-benchtime <t> = Run each benchmark for at least <t> seconds (default = 5.0)
-warmup <t> = Run each benchmark for <t> seconds (default = 1.0) prior to
     starting the timer, in order to prime the caches and thus improve the
     consistency of the results.
-componly = Stop after running compression tests.  Do not test decompression.
-nowrite = Do not write reference or output images (improves consistency of
     performance measurements.)

NOTE:  If the quality is specified as a range (e.g. 90-100), a separate
test will be performed for all quality values in the range.
[root@instance-jewlel2q bin]# ./wrjpgcom -h
wrjpgcom inserts a textual comment in a JPEG file.
You can add to or replace any existing comment(s).
Usage: ./wrjpgcom [switches] [inputfile]
Switches (names may be abbreviated):
  -replace         Delete any existing comments
  -comment "text"  Insert comment with given text
  -cfile name      Read comment from named file
Notice that you must put quotes around the comment text
when you use -comment.
If you do not give either -comment or -cfile on the command line,
then the comment text is read from standard input.
It can be multiple lines, up to 65000 characters total.
You must specify an input JPEG file name when supplying
comment text from standard input.