PS C:\wwwroot\react-native\react_natigation_demo> react-native run-android
Starting JS server...
Building and installing the app on the device (cd android && gradlew.bat installDebug)...

FAILURE: Build failed with an exception.

* Where:
Settings file 'C:\wwwroot\react-native\react_natigation_demo\android\settings.gradle' line: 3

* What went wrong:
Could not compile settings file 'C:\wwwroot\react-native\react_natigation_demo\android\settings.gradle'.
> startup failed:
  settings file 'C:\wwwroot\react-native\react_natigation_demo\android\settings.gradle': 3: unexpected char: '\' @ line 3, column 133.
     s\react-native-gesture-handler\android')
                                   ^

  1 error


* Try:
Run with --stacktrace option to get the stack trace. Run with --info or --debug option to get more log output. Run with --scan to get full insights.

* Get more help at https://help.gradle.org

BUILD FAILED in 3s
Could not install the app on the device, read the error above for details.
Make sure you have an Android emulator running or a device connected and have
set up your Android development environment:
https://facebook.github.io/react-native/docs/getting-started.html

Command failed: gradlew.bat installDebug

Error: Command failed: gradlew.bat installDebug
    at checkExecSyncError (child_process.js:600:11)
    at Object.execFileSync (child_process.js:618:13)
    at runOnAllDevices (C:\wwwroot\react-native\react_natigation_demo\node_modules\react-native\local-cli\runAndroid\runAndroid.js:299:19)
    at buildAndRun (C:\wwwroot\react-native\react_natigation_demo\node_modules\react-native\local-cli\runAndroid\runAndroid.js:135:12)
    at isPackagerRunning.then.result (C:\wwwroot\react-native\react_natigation_demo\node_modules\react-native\local-cli\runAndroid\runAndroid.js:65:12)
    at process._tickCallback (internal/process/next_tick.js:68:7)

PS C:\wwwroot\react-native\react_natigation_demo> react-native upgrade
You should consider using the new upgrade tool based on Git. It makes upgrades easier by resolving most conflicts automatically.
To use it:
- Go back to the old version of React Native
- Run "npm install -g react-native-git-upgrade"
- Run "react-native-git-upgrade"
See https://facebook.github.io/react-native/docs/upgrading.html
Upgrading project to react-native v0.58.6
Check out the release notes and breaking changes: https://github.com/facebook/react-native/releases/tag/v0.58.0
android\app\build.gradle has changed in the new version.
Do you want to keep your android\app\build.gradle or replace it with the latest version?
If you ever made any changes to this file, you'll probably want to keep it.
You can see the new version here: C:\wwwroot\react-native\react_natigation_demo\node_modules\react-native\local-cli\templates\HelloWorld\android\app\build.gradle
Do you want to replace android\app\build.gradle? Answer y to replace, n to keep your version:
y
Replacing android\app\build.gradle
android\app\src\main\java\com\react_natigation_demo\MainApplication.java has changed in the new version.
Do you want to keep your android\app\src\main\java\com\react_natigation_demo\MainApplication.java or replace it with the latest version?
If you ever made any changes to this file, you'll probably want to keep it.
You can see the new version here: C:\wwwroot\react-native\react_natigation_demo\node_modules\react-native\local-cli\templates\HelloWorld\android\app\src\main\java\com\helloworld\MainApplication.java
Do you want to replace android\app\src\main\java\com\react_natigation_demo\MainApplication.java? Answer y to replace, n to keep your version:
y
Replacing android\app\src\main\java\com\react_natigation_demo\MainApplication.java
android\settings.gradle has changed in the new version.
Do you want to keep your android\settings.gradle or replace it with the latest version?
If you ever made any changes to this file, you'll probably want to keep it.
You can see the new version here: C:\wwwroot\react-native\react_natigation_demo\node_modules\react-native\local-cli\templates\HelloWorld\android\settings.gradle
Do you want to replace android\settings.gradle? Answer y to replace, n to keep your version:
y
Replacing android\settings.gradle
ios\react_natigation_demo.xcodeproj\project.pbxproj has changed in the new version.
Do you want to keep your ios\react_natigation_demo.xcodeproj\project.pbxproj or replace it with the latest version?
If you ever made any changes to this file, you'll probably want to keep it.
You can see the new version here: C:\wwwroot\react-native\react_natigation_demo\node_modules\react-native\local-cli\templates\HelloWorld\ios\HelloWorld.xcodeproj\project.pbxproj
Do you want to replace ios\react_natigation_demo.xcodeproj\project.pbxproj? Answer y to replace, n to keep your version:
y
Replacing ios\react_natigation_demo.xcodeproj\project.pbxproj
Successfully upgraded this project to react-native v0.58.6
PS C:\wwwroot\react-native\react_natigation_demo> react-native run-android
JS server already running.
Building and installing the app on the device (cd android && gradlew.bat installDebug)...

> Configure project :app
WARNING: The specified Android SDK Build Tools version (28.0.2) is ignored, as it is below the minimum supported version (28.0.3) for Android Gradle Plugin 3.2.1.
Android SDK Build Tools 28.0.3 will be used.
To suppress this warning, remove "buildToolsVersion '28.0.2'" from your build.gradle file, as each version of the Android Gradle Plugin now has a default version of the build tools.

> Task :app:installDebug
10:18:46 V/ddms: execute: running am get-config
10:18:46 V/ddms: execute 'am get-config' on 'TA39200H1V' : EOF hit. Read: -1
10:18:46 V/ddms: execute: returning
Installing APK 'app-debug.apk' on 'XT1572 - 7.0' for app:debug
10:18:46 D/app-debug.apk: Uploading app-debug.apk onto device 'TA39200H1V'
10:18:46 D/Device: Uploading file onto device 'TA39200H1V'
10:18:46 D/ddms: Reading file permision of C:\wwwroot\react-native\react_natigation_demo\android\app\build\outputs\apk\debug\app-debug.apk as: rwx------
10:18:48 V/ddms: execute: running pm install -r -t "/data/local/tmp/app-debug.apk"
10:18:51 V/ddms: execute 'pm install -r -t "/data/local/tmp/app-debug.apk"' on 'TA39200H1V' : EOF hit. Read: -1
10:18:51 V/ddms: execute: returning
10:18:51 V/ddms: execute: running rm "/data/local/tmp/app-debug.apk"
10:18:51 V/ddms: execute 'rm "/data/local/tmp/app-debug.apk"' on 'TA39200H1V' : EOF hit. Read: -1
10:18:51 V/ddms: execute: returning
Installed on 1 device.

BUILD SUCCESSFUL in 46s
28 actionable tasks: 28 executed
Running C:\Users\imfon\AppData\Local\Android\Sdk/platform-tools/adb -s TA39200H1V reverse tcp:8081 tcp:8081
adb server version (32) doesn't match this client (40); killing...
* daemon started successfully
Starting the app on TA39200H1V (C:\Users\imfon\AppData\Local\Android\Sdk/platform-tools/adb -s TA39200H1V shell am start -n com.react_natigation_demo/com.react_natigation_demo.MainActivity)...
Starting: Intent { cmp=com.react_natigation_demo/.MainActivity }
微信小程序一些函数
rich-text 批量自适应宽度
imgWidth:function(data){
  return data.replace(/\<img/gi, '<img style="max-width:100%;height:auto" ')
}
小程序获取元素高
get_wxml: function(className, callback) {
  wx.createSelectorQuery().selectAll(className).boundingClientRect(callback).exec()
},
get_height:function(className,callback){
  //获取节点信息
  this.get_wxml(className, (rects) => {
  console.log('rects', rects)
  let height = rects[0].height
  callback(height)
  })
},
关于 Memcache 的过期时间
$me = memcache_connect('127.0.0.1', 11811);
$me -> set('key','value',false,10);
过期时间小于0
报错
过期时间等于0
无过期时间(默认30天,待求证)
过期时间大于0
设置的过期时间
过期时间大于30天
30天
ThinkPHP 3.2 使用的一些记录
在 View 模板引擎中输出数组的下标值
如 数组 $list 和 下标 $data.vo.id
{$list[$data[vo][id]]}
若变量为空,赋予默认值(判断空)
{$vo.position_id|default='空'}获得 MySQL 数据表备注
//获取备注信息
public function _get_field() {
  $model = new \Think\Model();
  $controller_name = $this->CamelCaseToUnderScore(CONTROLLER_NAME);
  $rs = $model->query("select `column_name`,`column_comment` from information_schema.COLUMNS WHERE TABLE_SCHEMA = '".C('DB_NAME')."' AND TABLE_NAME = '".C('DB_PREFIX').$controller_name."'");

  $arr = array_column($rs,'column_comment','column_name');
  return $arr;
}
//驼峰命名转下划线命名
public function CamelCaseToUnderScore($str)
{
  $dstr = preg_replace_callback('/([A-Z]+)/',function($matchs)
  {
    return '_'.strtolower($matchs[0]);
  },$str);
  return trim(preg_replace('/_{2,}/','_',$dstr),'_');
}
PHP 数组变量传递给 JS
var arr=transArr({$array|json_encode=true});
function transArr(obj) {
var tem=[];
$.each(obj, function(i) {
tem[i]=obj[i];
});
return tem;
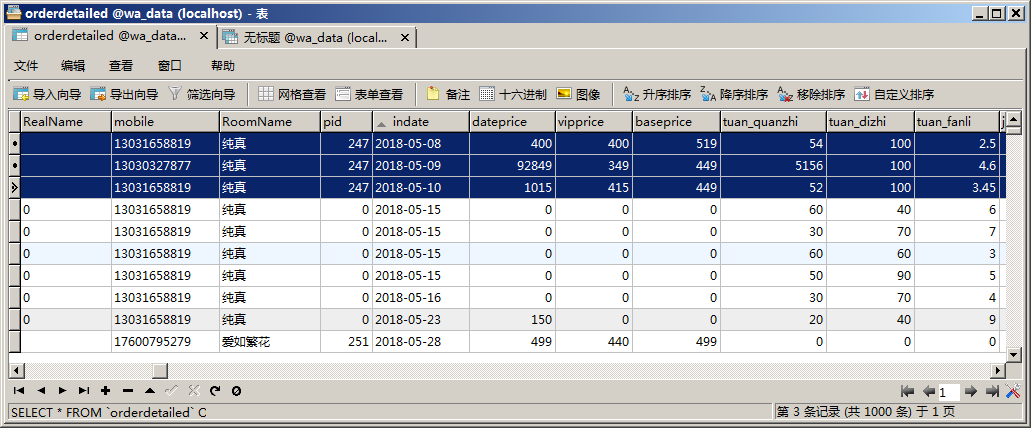
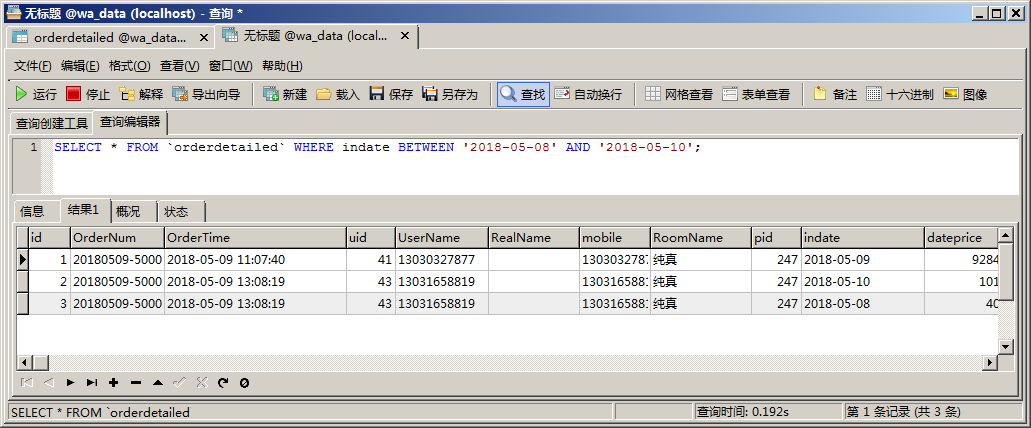
}MySQL 对于时间 date、datetime 的 BETWEEN 查询边界问题
使用 date 查询 date 字段
使用 date 查询 datetime 字段
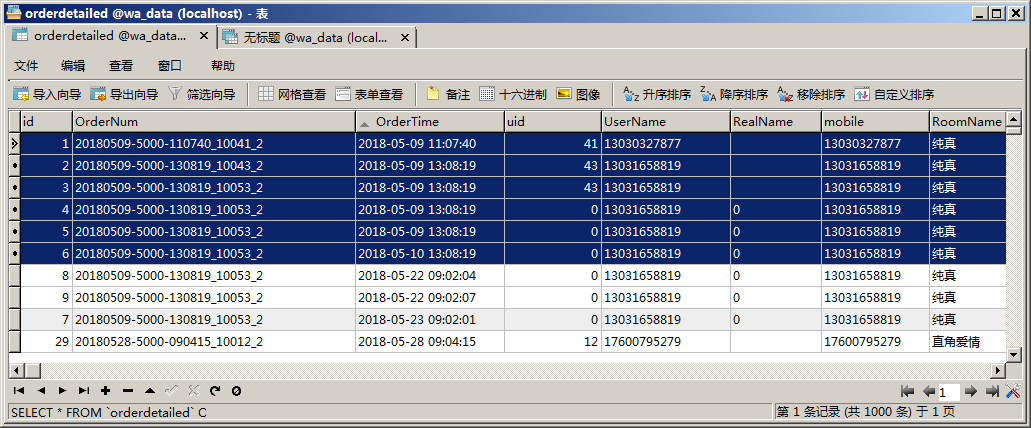
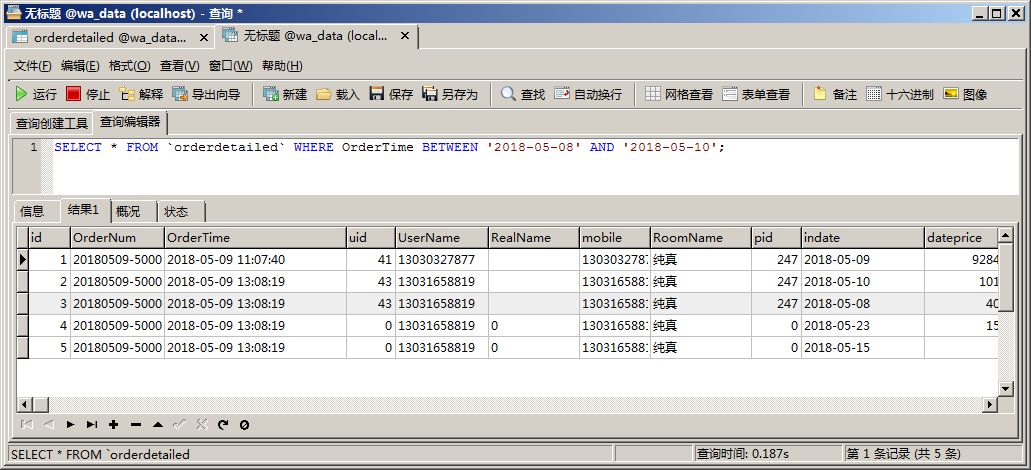
使用 datetime 查询 date 字段
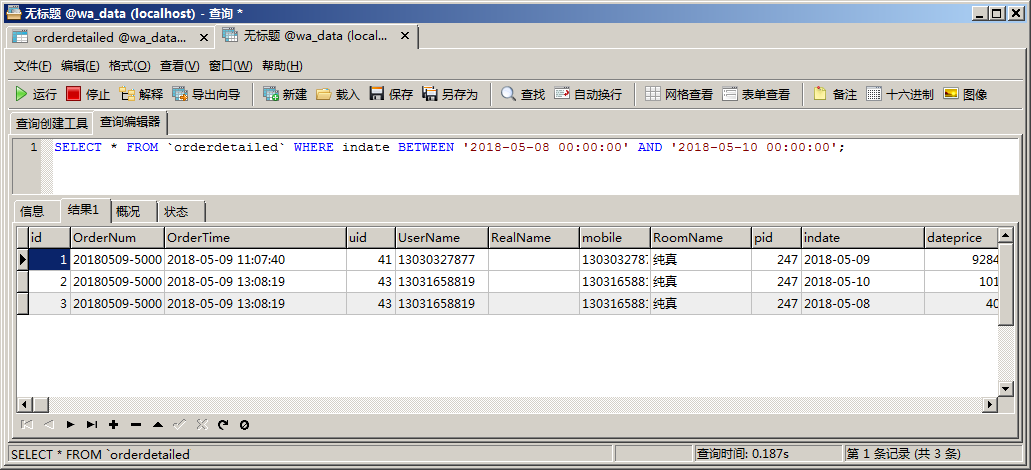
使用 datetime 查询 datetime

生成指定页面带参数的微信小程序码
使用 Postman GET 请求
https://api.weixin.qq.com/cgi-bin/token?grant_type=client_credential&appid=xxxxxxxxxxxxx&secret=xxxxxxxxxxxxx
保存下 access_token,然后 POST 请求,配置如下,请求获得小程序码
https://api.weixin.qq.com/wxa/getwxacode?access_token=xxxxxxxxxx
或请求生成 QR 二维码
https://api.weixin.qq.com/cgi-bin/wxaapp/createwxaqrcode?access_token=xxxxxxxxxx
HTML页面顶部出现空白部分()字符

检查出现 (#65279) 字符的相关页面(php,html,css,js等),查看页面编码方式,如果是 UTF-8 + BOM 编码方式,则使用 notepad++ 或其他工具存储为 “UTF-8无BOM” 即可解决。
PhpStorm 可以右键选择 Remove BOM

PHP 二维数组 按照 Value 中某 key 进行排序 获得另一个 key 的排序

<?php
$arr = [
    ['id'=>1,'main'=>222],
    ['id'=>2,'main'=>333],
    ['id'=>2,'main'=>444],
    ['id'=>1,'main'=>111],
    ['id'=>3,'main'=>122],
    ];

    $a = array_column($arr,'main');
    $b = array_column($arr,'id');

    echo "<pre>";
    var_dump($a,$b);
    var_dump(array_multisort($a,SORT_DESC,$b));
    var_dump($a,$b);
?>
array_multisort() 先把第一个数组按照键值的大小排序,然后其它数组都按照第一个数组的调整策略进行调整。
优化一下则为

<?php
$arr = [
['id'=>1,'main'=>222],
['id'=>2,'main'=>333],
['id'=>2,'main'=>444],
['id'=>1,'main'=>111],
['id'=>3,'main'=>122],
];
echo "<pre>";
array_multisort(array_column($arr,'main'),SORT_DESC,$arr);
var_dump($arr);
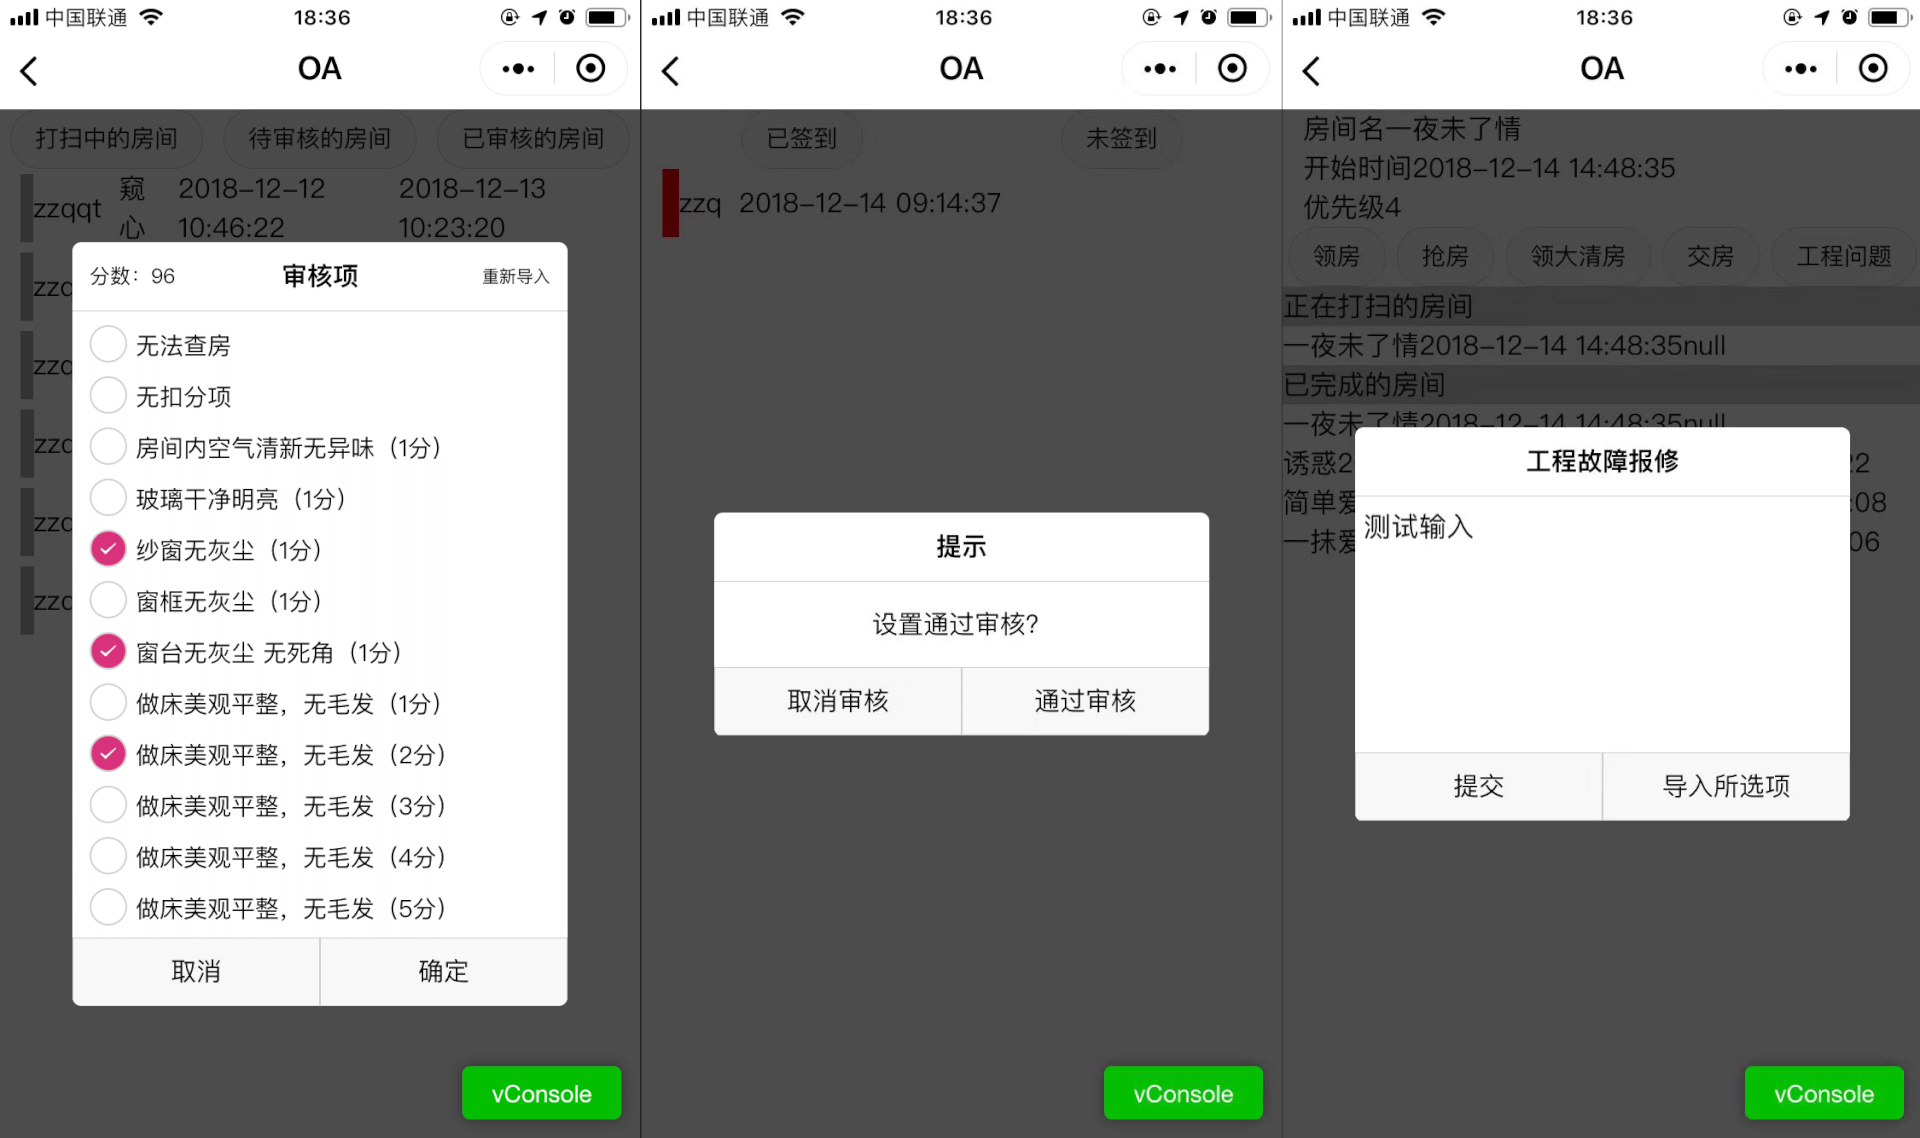
?>封装一个微信小程序 多功能模态框组件 Modal
自定义一个微信小程序多功能模态框,可以输入文本 textarea,可以多选列表 CheckBox
组件
/components/modal/index.js
const app = getApp()
Component({
  properties: {
    show: {
      type: Boolean,
      value: true
    },
    title: {
      type: String,
      value: '标题'
    },
    moreRight: {
      type: String,
      value: ''
    },
    moreLeft: {
      type: String,
      value: ''
    },
    content: {
      type: String,
      value: '内容'
    },
    list: {
      type: Array,
      value: [
        {
          title: '测试',
          id: ''
        }]
    },
    bg:{
      type:Boolean,
      value:true
    },
    mode: {
      type: String,
      value: 'content'
    },
    btnLeft: {
      type: String,
      value: '取消'
    },
    btnRight: {
      type: String,
      value: '确定'
    }
  },
  data: {

  },

  methods: {
    _none:function(){
      //nothing
    },
    _hideDialog(){
      this.setData({
        show:false
      })
      console.log('hide')
      this.triggerEvent('tapBg')
    },

    _showDialog() {
      this.setData({
        show: true
      })
    },
    _textarea(e){
      console.log(e.detail.value)
      var value = e.detail.value
      this.triggerEvent("myInput",value)
    },
    _tapLeft() {
      this.triggerEvent("tapLeft")
    },
    _tapRight() {
      this.triggerEvent("tapRight")
    },
    _moreRight() {
      this.triggerEvent("moreRight")
    },
    _moreLeft() {
      this.triggerEvent("moreLeft")
    },
    _checkboxChange(e){
      // console.log(e.detail.value)
      var value = e.detail.value
      this.triggerEvent("select", value)
    },
  },
})
/components/modal/index.json
{
  "component": true
}
/components/modal/index.wxml
<view class="mask" style="{{show?'z-index: 1;opacity:0.7':''}}"></view>
<view class='modalBg' bindtap='_hideDialog' wx:if="{{show}}">
  <view class="modalDlg" catchtap='_none'>
    <view class='_modalTitle'>
      <view catchtap='_moreLeft' class='_more-left'>{{moreLeft}}</view>
      <text class='_title'>{{title}}</text>
      <view catchtap='_moreRight' class='_more-right'>{{moreRight}}</view>
    </view>
    <view wx:if="{{mode=='content'}}">{{content}}</view>
    <textarea wx:if="{{mode=='textarea'}}" bindinput='_textarea' value="{{content}}">
    </textarea>
    <scroll-view scroll-y="{{true}}" wx:if="{{mode=='list'}}">
      <view class='_check-container'>
        <checkbox-group bindchange="_checkboxChange">
          <label class="checkbox" wx:for="{{list}}" wx:key="{{key}}">
            <checkbox value="{{item.id}}" />
            <text class='checkbox-text'>{{item.title}}</text>
          </label>
        </checkbox-group>
      </view>
    </scroll-view>
    <view class='button-container'>
      <button catchtap="_tapLeft">{{btnLeft}}</button>
      <button catchtap="_tapRight">{{btnRight}}</button>
    </view>
  </view>
</view>
/components/modal/index.wxss
/* 自定义模态框 */

.mask {
  width: 100%;
  height: 100%;
  position: fixed;
  top: 0;
  left: 0;
  background: #000;
  z-index: -99999;
  opacity: 0;
  transition: opacity 0.5s ease;
}

.modalBg {
  width: 100%;
  height: 100%;
  display: flex;
  flex-direction: row;
  justify-content: center;
  align-items: center;
  position: fixed;
  left: 0;
  top: 0;
  z-index: 2;
}

.modalDlg {
  width: 580rpx;
  min-height: 200rpx;
  max-height: 900rpx;
  position: relative;
  z-index: 9999;
  background-color: #fff;
  border-radius: 10rpx;
  /* display: flex;
  flex-direction: column;
  align-items: center;
  justify-content: space-between; */
  overflow: hidden;
}

.modalDlg>view {
  font-size: 30rpx;
  min-height: 60rpx;
  display: flex;
  flex-direction: row;
  justify-content: center;
  align-items: center;
}

.modalDlg>view:first-child {
  height: 80rpx;
  font-weight: 700;
  width: 100%;
  border-bottom: 1rpx solid #ccc;
  display: flex;
  flex-direction: row;
  justify-content: space-between;
  align-items: center;
}

.modalDlg>view:nth-child(2) {
  height: 100rpx;
  margin: 0 40rpx;
}

.modalDlg>view {
  display: flex;
  flex-direction: row;
  justify-content: center;
  align-items: center;
}

.modalDlg>view>button {
  width: 290rpx;
  height: 80rpx;
  font-size: 30rpx;
  border-radius: 0;
  display: flex;
  flex-direction: row;
  justify-content: center;
  align-items: center;
  border-top: 1rpx solid #ccc;
}

.modalDlg>view>button:first-child {
  border-right: 1rpx solid #ccc;
}

.modalDlg>view>button::after {
  border-radius: 0;
  border: none;
}

._modalTitle {
  display: flex;
  flex-direction: row;
  justify-content: space-between;
  align-items: center;
  position: relative;
}

._title {
  margin: 10rpx;
  text-align: center;
  width: 560rpx;
  padding: 10rpx;
}

._more-right {
  position: absolute;
  right: 20rpx;
  font-size: 20rpx;
  font-weight: 400;
}

._more-left {
  position: absolute;
  left: 20rpx;
  font-size: 25rpx;
  font-weight: 400;
}

scroll-view {
  height: inherit;
  width: inherit;
  overflow: hidden;
  max-height: 735rpx;
}

._check-container checkbox-group {
  display: flex;
  flex-direction: column;
  justify-content: flex-start;
  align-items: flex-start;
  background-color: #fefefe;
  padding-left: 20rpx;
}
使用方法
/pages/test/test.json
{
  "usingComponents": {
    "my-modal": "/components/modal/index"
  }
}
/pages/test/test.wxml
<my-modal title="{{modal.title}}" mode="{{modal.mode}}" show="{{myModalShow}}" content="{{modal.content}}" btn-left="{{modal.btnLeft}}" btn-right='{{modal.btnRight}}' bind:tapLeft="{{modal.tapLeft}}" bind:tapRight="{{modal.tapRight}}" bind:tapBg="tapBg"></my-modal>/pages/test/test.js
  myModalShow: function() {
    console.log('myModalShow')
    this.setData({
      myModalShow: true
    })
  },

  myModalHide: function() {
    this.setData({
      myModalShow: false,
      modal: {},
    })
  },
  showit:function(){
    var modal = {
      mode: 'content',
      content: '这是内容',
      title: '提示',
      btnLeft: '取消',
      btnRight: '确定',
      tapLeft: 'myModalHide',
      tapRight: 'do',
    }
    that.setData({
      modal: modal,
    })
    that.myModalShow()
  },
/pages/test/test.wxss
checkbox-group {
  display: flex;
  flex-direction: row;
  justify-content: space-between;
  align-items: center;
}

.checkbox {
  display: flex;
  flex-direction: row;
  justify-content: center;
  align-items: center;
}
.checkbox-text {
  font-size: 25rpx;
}

/*  重写 checkbox 样式  */

checkbox-group{

  font-size:28rpx;
}
checkbox-group label{
  line-height:60rpx;
}
checkbox-group label:first-child{
  margin-top:10rpx;
}

/* 未选中的 背景样式 */

checkbox .wx-checkbox-input {
  border-radius: 50%; /* 圆角 */
  width: 40rpx; /* 背景的宽 */
  height: 40rpx; /* 背景的高 */
  margin-top: -8rpx;
}

/* 选中后的 背景样式 (红色背景 无边框 可根据UI需求自己修改) */

checkbox .wx-checkbox-input.wx-checkbox-input-checked {
  /* border: none;  */
  background: rgb(217, 50, 124);
}

/* 选中后的 对勾样式 (白色对勾 可根据UI需求自己修改) */

checkbox .wx-checkbox-input.wx-checkbox-input-checked::before {
  display: flex;
  border-radius: 50%; /* 圆角 */
  width: 20rpx; /* 选中后对勾大小,不要超过背景的尺寸 */
  height: 25rpx; /* 选中后对勾大小,不要超过背景的尺寸 */
  line-height: 25rpx;
  text-align: center;
  font-size: 20rpx; /* 对勾大小 30rpx */
  color: #fff; /* 对勾颜色 白色 */
  background: transparent;
  transform: translate(-50%, -50%) scale(1);
  -webkit-transform: translate(-50%, -50%) scale(1);
}
PHP foreach 与 array_merge_recursive 函数性能对比

