图片多了太占空间,之前项目的图片有 10G,删掉可以留着占空间,近期就写了个图片压缩的程序 压缩 JPG/JPEG/BMP/PNG/GIF,将文件夹里的文件扫描添加至队列,然后执行计划任务将六万多张图片压缩完成。
仅部分图片由于本身格式存在问题无法压缩成功。
原本不压缩尺寸只压缩格式,发现还是需要占3个多G,后将宽度大于400的压缩至400,减少至不到2G


学习日志 LIUGUOFENG
图片多了太占空间,之前项目的图片有 10G,删掉可以留着占空间,近期就写了个图片压缩的程序 压缩 JPG/JPEG/BMP/PNG/GIF,将文件夹里的文件扫描添加至队列,然后执行计划任务将六万多张图片压缩完成。
仅部分图片由于本身格式存在问题无法压缩成功。
原本不压缩尺寸只压缩格式,发现还是需要占3个多G,后将宽度大于400的压缩至400,减少至不到2G
操作逻辑感人
1 无法识别文件夹

2 正在压缩时添加新文件会替换掉现在的压缩列队
3 开启裁剪缩放默认为 1*1,手动修改为自己的设定如 400*400,退出软件在再进入会变成 1*1,且裁剪缩放为开启。如果你选择了替换原图,那么恭喜你了
4 文件过多会超级慢,一个五万文件的文件夹(含子目录),扫描有将近一个小时(就算用 PHP 操作也不会超过 30s),扫描完成后默认先压缩文件夹……然后提示你文件类型出错,而且你的界面会很卡,想看下滚动条都难
5 安装过程不会自动判断是否需要安装额外的库,如果你没有选中且本机原先没有,那么它会一直安装失败
6 有时会卡住。文件普普通通但就是不压缩
先写这么多
访问网址(将来可能会变)
演示如下
https://file.liuguofeng.com/video/Video_2018-11-14_204158_x264.mp4
下载会慢,因为 1Mb 小水管
json_encode 所有字符串数据的编码必须是 UTF-8,否则返回 false
如果不是 utf-8 可以utf8_encode()处理下
数组中存在哪些字符会导致数组json_encode返回false
https://segmentfault.com/q/1010000008908162

自行编译安装 gcc,依然提示,
当使用 gcc -v 提示已安装 gcc version 4.8.2
但使用 yum install gcc 提示是 4.4 且为最新版本

解决办法,卸载 yum 版 gcc,然后重新编译安装
yum remove gccCentOS 6 升级安装gcc 4.8
https://blog.csdn.net/bdss58/article/details/78175892
rpm --import http://linuxsoft.cern.ch/cern/slc68/x86_64/RPM-GPG-KEY-cernwget -O /etc/yum.repos.d/slc6-devtoolset.repo http://linuxsoft.cern.ch/cern/devtoolset/slc6-devtoolset.repoyum install devtoolset-2source /opt/rh/devtoolset-2/enable可以将此命令写入.bashrc中,以免每次手动执行
echo 'source /opt/rh/devtoolset-2/enable' >> ~/.bashrc验证一下gcc版本:
$ gcc --version
gcc (GCC) 4.8.2 20140120 (Red Hat 4.8.2-15)
...Gifsicle 官网
https://www.lcdf.org/gifsicle/
cd ~
wget https://www.lcdf.org/gifsicle/gifsicle-1.91.tar.gz
tar -zxvf gifsicle-1.91.tar.gz
cd gifsicle-1.91/
./configure
make
make install
使用:
gifsicle -O3 path.gif -o newpath.gif
[root@instance-jewlel2q tmp]# gifsicle --sinfo x.gif
* x.gif 98 images
  logical screen 800x450
  global color table [256]
  background 0
  loop forever
  + image #0 800x450
    compressed size 133044
    comment Edited with ezgif.com online GIF maker
    disposal asis delay 0.10s
  + image #1 800x450
    compressed size 133243
    local color table [256]
    disposal asis delay 0.10s
  + image #2 800x450
    compressed size 134192
    local color table [256]
    disposal asis delay 0.10s
  + image #3 800x450
    compressed size 130221
    local color table [256]
    disposal asis delay 0.10s
[root@instance-jewlel2q tmp]# gifsicle -O3 x.gif -o x1.gif --resize-fit 400
gifsicle: invalid dimensions ‘400’ (want WxH)
gifsicle: warning: too many colors, using local colormaps
  (You may want to try ‘--colors 256’.)
[root@instance-jewlel2q tmp]# gifsicle -h
'Gifsicle' manipulates GIF images. Its most common uses include combining
single images into animations, adding transparency, optimizing animations for
space, and printing information about GIFs.

Usage: gifsicle [OPTION | FILE | FRAME]...

Mode options: at most one, before any filenames.
  -m, --merge                   Merge mode: combine inputs, write stdout.
  -b, --batch                   Batch mode: modify inputs, write back to
                                same filenames.
  -e, --explode                 Explode mode: write N files for each input,
                                one per frame, to 'input.frame-number'.
  -E, --explode-by-name         Explode mode, but write 'input.name'.

General options: Also --no-OPTION for info and verbose.
  -I, --info                    Print info about input GIFs. Two -I's means
                                normal output is not suppressed.
      --color-info, --cinfo     --info plus colormap details.
      --extension-info, --xinfo --info plus extension details.
      --size-info, --sinfo      --info plus compression information.
  -V, --verbose                 Prints progress information.
  -h, --help                    Print this message and exit.
      --version                 Print version number and exit.
  -o, --output FILE             Write output to FILE.
  -w, --no-warnings             Don't report warnings.
      --no-ignore-errors        Quit on very erroneous input GIFs.
      --conserve-memory         Conserve memory at the expense of speed.
      --multifile               Support concatenated GIF files.

Frame selections:               #num, #num1-num2, #num1-, #name

Frame change options:
  --delete FRAMES               Delete FRAMES from input.
  --insert-before FRAME GIFS    Insert GIFS before FRAMES in input.
  --append GIFS                 Append GIFS to input.
  --replace FRAMES GIFS         Replace FRAMES with GIFS in input.
  --done                        Done with frame changes.

Image options: Also --no-OPTION and --same-OPTION.
  -B, --background COL          Make COL the background color.
      --crop X,Y+WxH, --crop X,Y-X2,Y2
                                Crop the image.
      --crop-transparency       Crop transparent borders off the image.
      --flip-horizontal, --flip-vertical
                                Flip the image.
  -i, --interlace               Turn on interlacing.
  -S, --logical-screen WxH      Set logical screen to WxH.
  -p, --position X,Y            Set frame position to (X,Y).
      --rotate-90, --rotate-180, --rotate-270, --no-rotate
                                Rotate the image.
  -t, --transparent COL         Make COL transparent.

Extension options:
      --app-extension N D       Add an app extension named N with data D.
  -c, --comment TEXT            Add a comment before the next frame.
      --extension N D           Add an extension number N with data D.
  -n, --name TEXT               Set next frame's name.
      --no-comments, --no-names, --no-extensions
                                Remove comments (names, extensions) from input.
Animation options: Also --no-OPTION and --same-OPTION.
  -d, --delay TIME              Set frame delay to TIME (in 1/100sec).
  -D, --disposal METHOD         Set frame disposal to METHOD.
  -l, --loopcount[=N]           Set loop extension to N (default forever).
  -O, --optimize[=LEVEL]        Optimize output GIFs.
  -U, --unoptimize              Unoptimize input GIFs.
  -j, --threads[=THREADS]       Use multiple threads to improve speed.

Whole-GIF options: Also --no-OPTION.
      --careful                 Write larger GIFs that avoid bugs in other
                                programs.
      --change-color COL1 COL2  Change COL1 to COL2 throughout.
  -k, --colors N                Reduce the number of colors to N.
      --color-method METHOD     Set method for choosing reduced colors.
  -f, --dither                  Dither image after changing colormap.
      --gamma G                 Set gamma for color reduction [2.2].
      --resize WxH              Resize the output GIF to WxH.
      --resize-width W          Resize to width W and proportional height.
      --resize-height H         Resize to height H and proportional width.
      --resize-fit WxH          Resize if necessary to fit within WxH.
      --scale XFACTOR[xYFACTOR] Scale the output GIF by XFACTORxYFACTOR.
      --resize-method METHOD    Set resizing method.
      --resize-colors N         Resize can add new colors up to N.
      --transform-colormap CMD  Transform each output colormap by shell CMD.
      --use-colormap CMAP       Set output GIF's colormap to CMAP, which can
                                be 'web', 'gray', 'bw', or a GIF file.

Report bugs to <ekohler@gmail.com>.
Too much information? Try 'gifsicle --help | more'.官网
https://pngquant.org/
cd ~
git clone git://github.com/kornelski/pngquant.git
cd pngquant
./configure
make
make install


当 disable_functions 不包含 exec 函数时,返回

当 disable_functions 包含 exec 函数时,返回

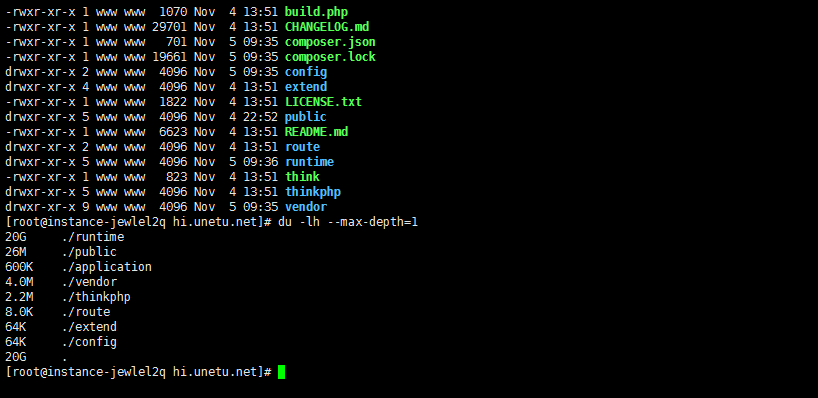
MySQL 无法启动,报错如下
Starting MySQL.. ERROR! The server quit without updating PID file经排查磁盘满了,原来是 swoole 的日志占了 20G
查看当前目录下文件夹占用的方法
du -lh --max-depth=1

如何下载 Instagram 上的图片?写了个小程序
微信小程序 搜索 ZeroNet